"GK Skinny Pasta Spaghetti Pie" with "Coconut Flour Crust"

I love trying new things, especially taking a recipe that might be a little on the decadent side or that would send you into carb overload and making it healthier..

One of the things I love and almost rarely ever ate over the past several years was pasta..

Getting older isn't easy, and needing to change up your eating habits can be difficult but luckily for a lot of us there are a few companies who have heard our cry for a healthy pasta alternative that doesn't involve zucchini..

This particular brand is "GK Skinny Pasta"

Gabriella's Kitchen has been making pasta alternatives, gluten free and teff pastas for a while now, but my favorites by far are the high protein low carb pastas they've created..

An that's where this comes in..

This recipe was one I made years ago but it's so filling, and so carb and fat heavy, that I just couldn't bring myself to make it again..

Now taking my new discovery of skinny pasta, and a pie crust I've been experimenting with, I went about making a healthy version of an incredibly scrumptious dinner dish..

Using part skim, low fat, low carb ingredients with a minimum of oil and turkey sausage—I've gone about creating a meal that is anything but bad for you no matter how gluttonous you might feel enjoying it..


Full of tons of protein, vegetables and fiber—you'll definitely feel satiated after a piece of this..

So give it a try yourself, and give "GK Skinny Pasta" a try to—I know that you'll find them both "Definitely Delish"


"Baked Spaghetti Pie" with GK SkinnyPasta and "Coconut Flour Crust"
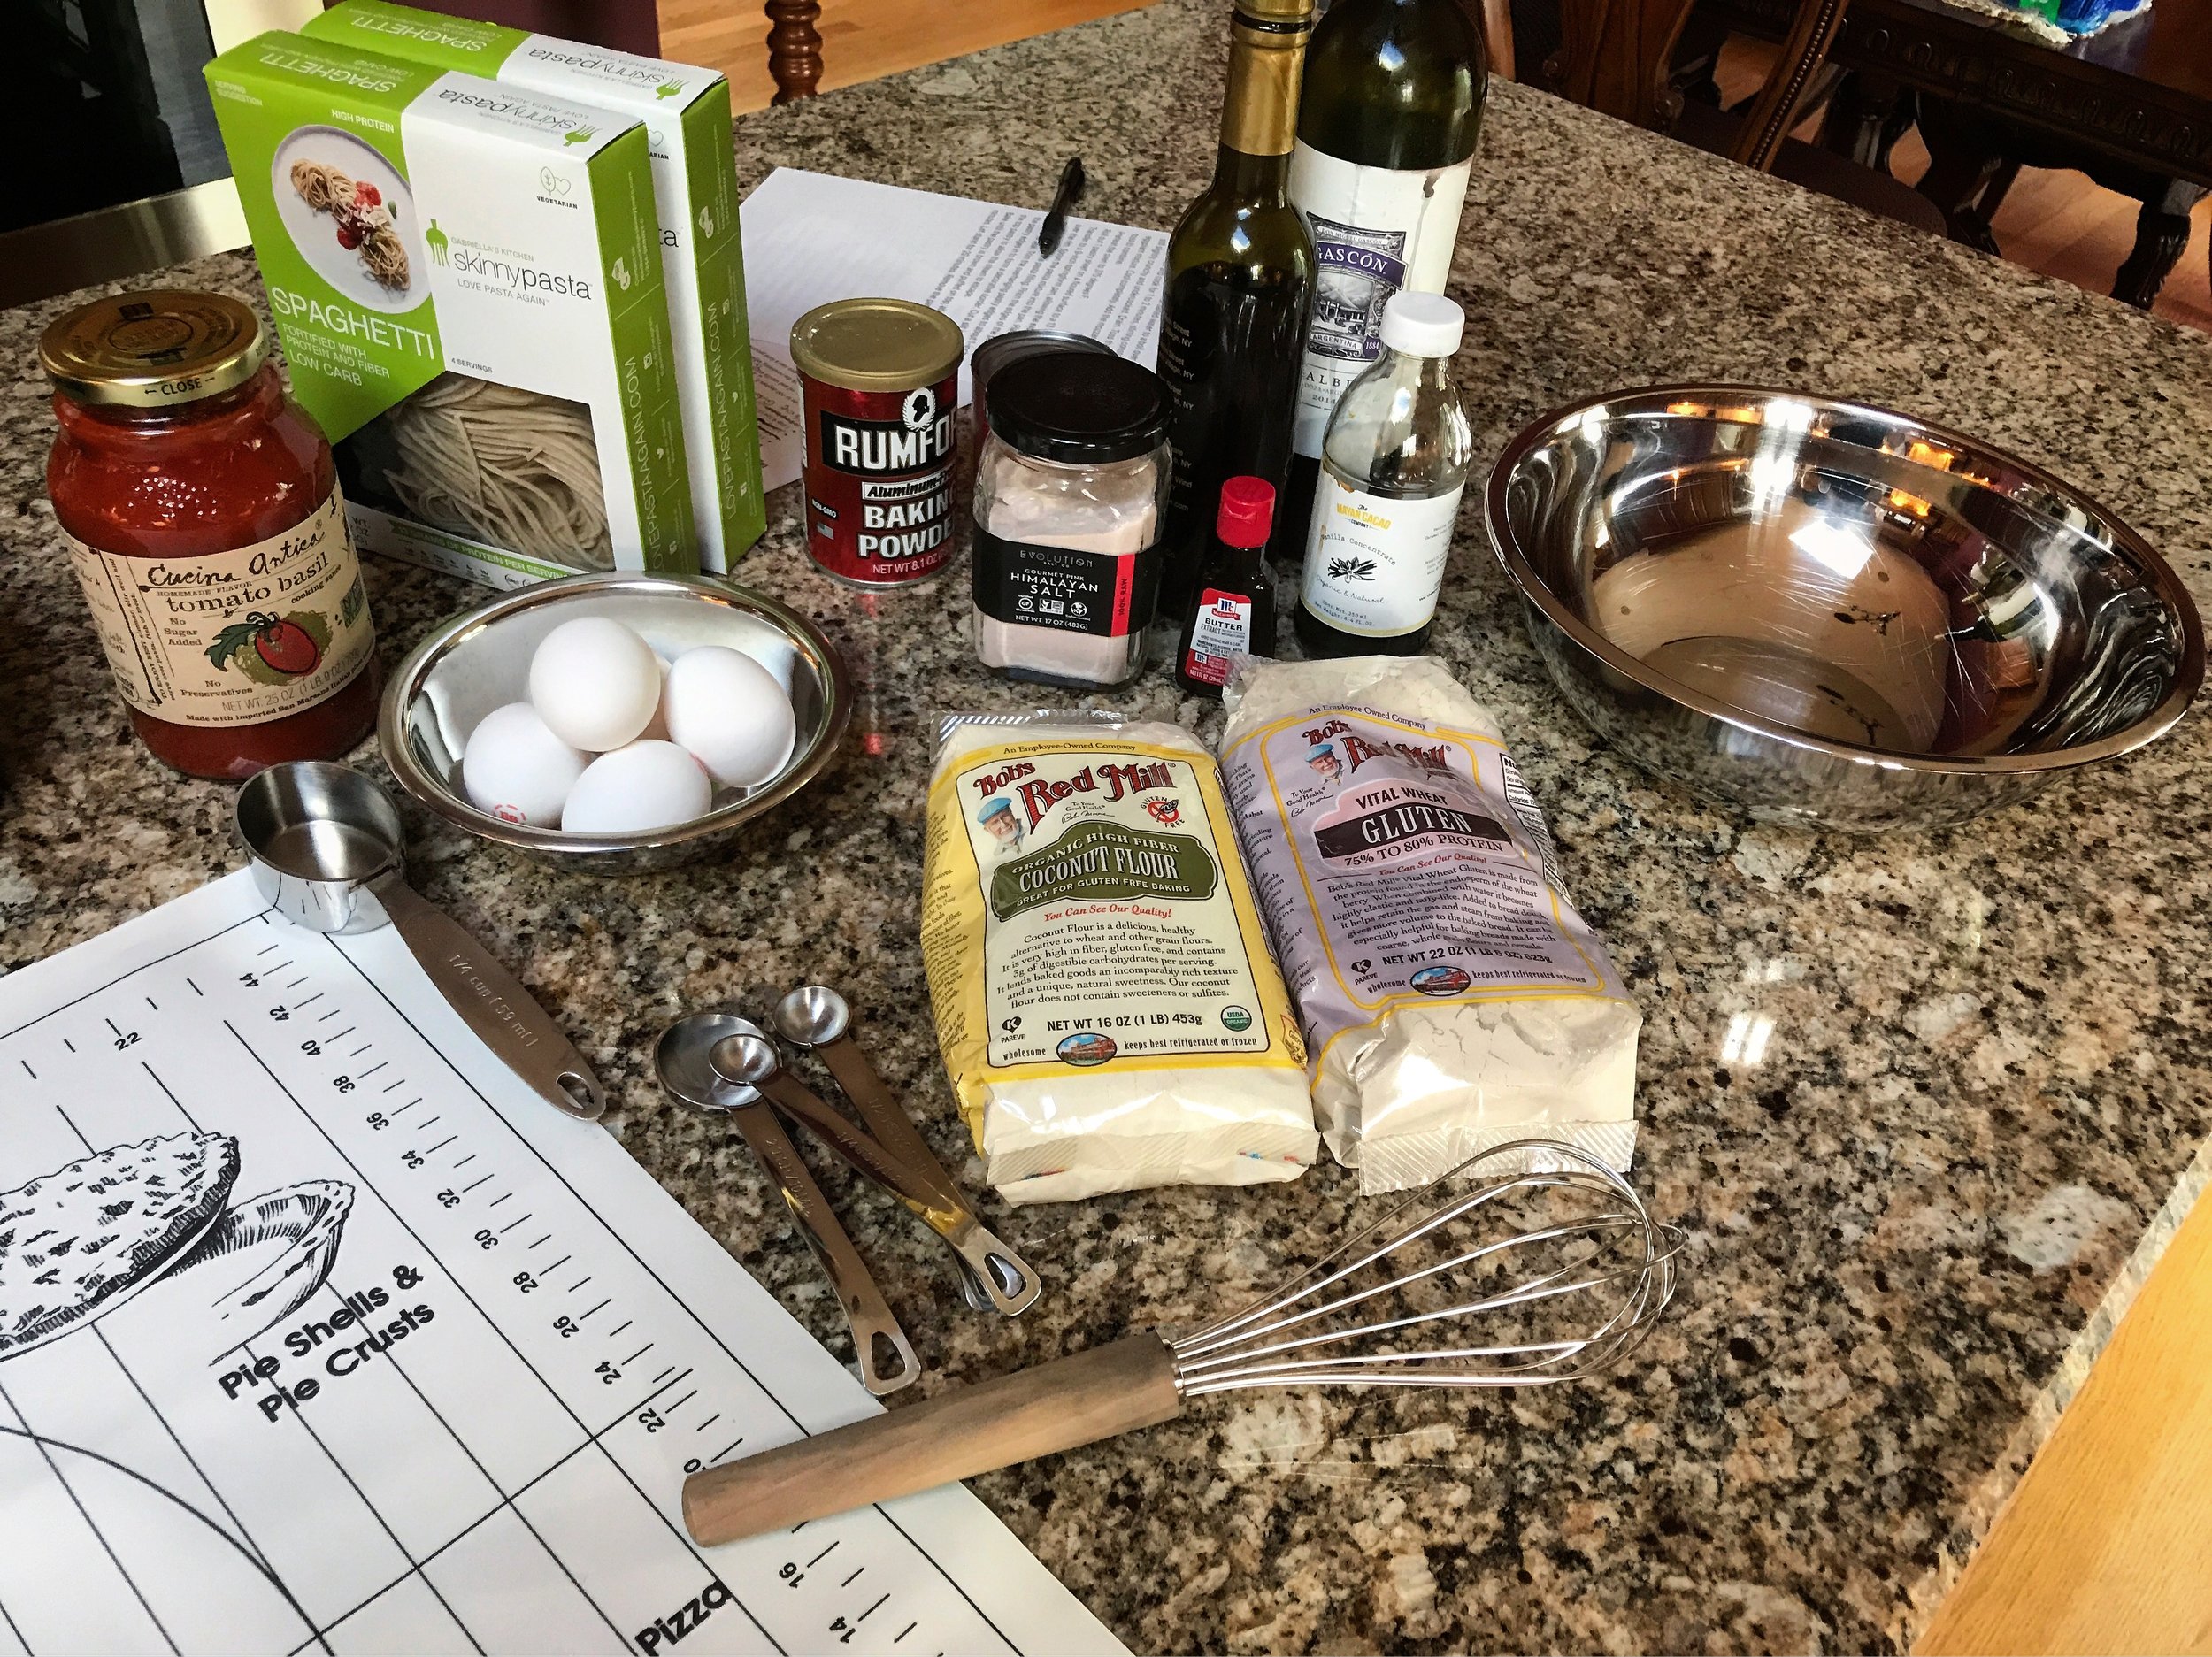
Ingredients:
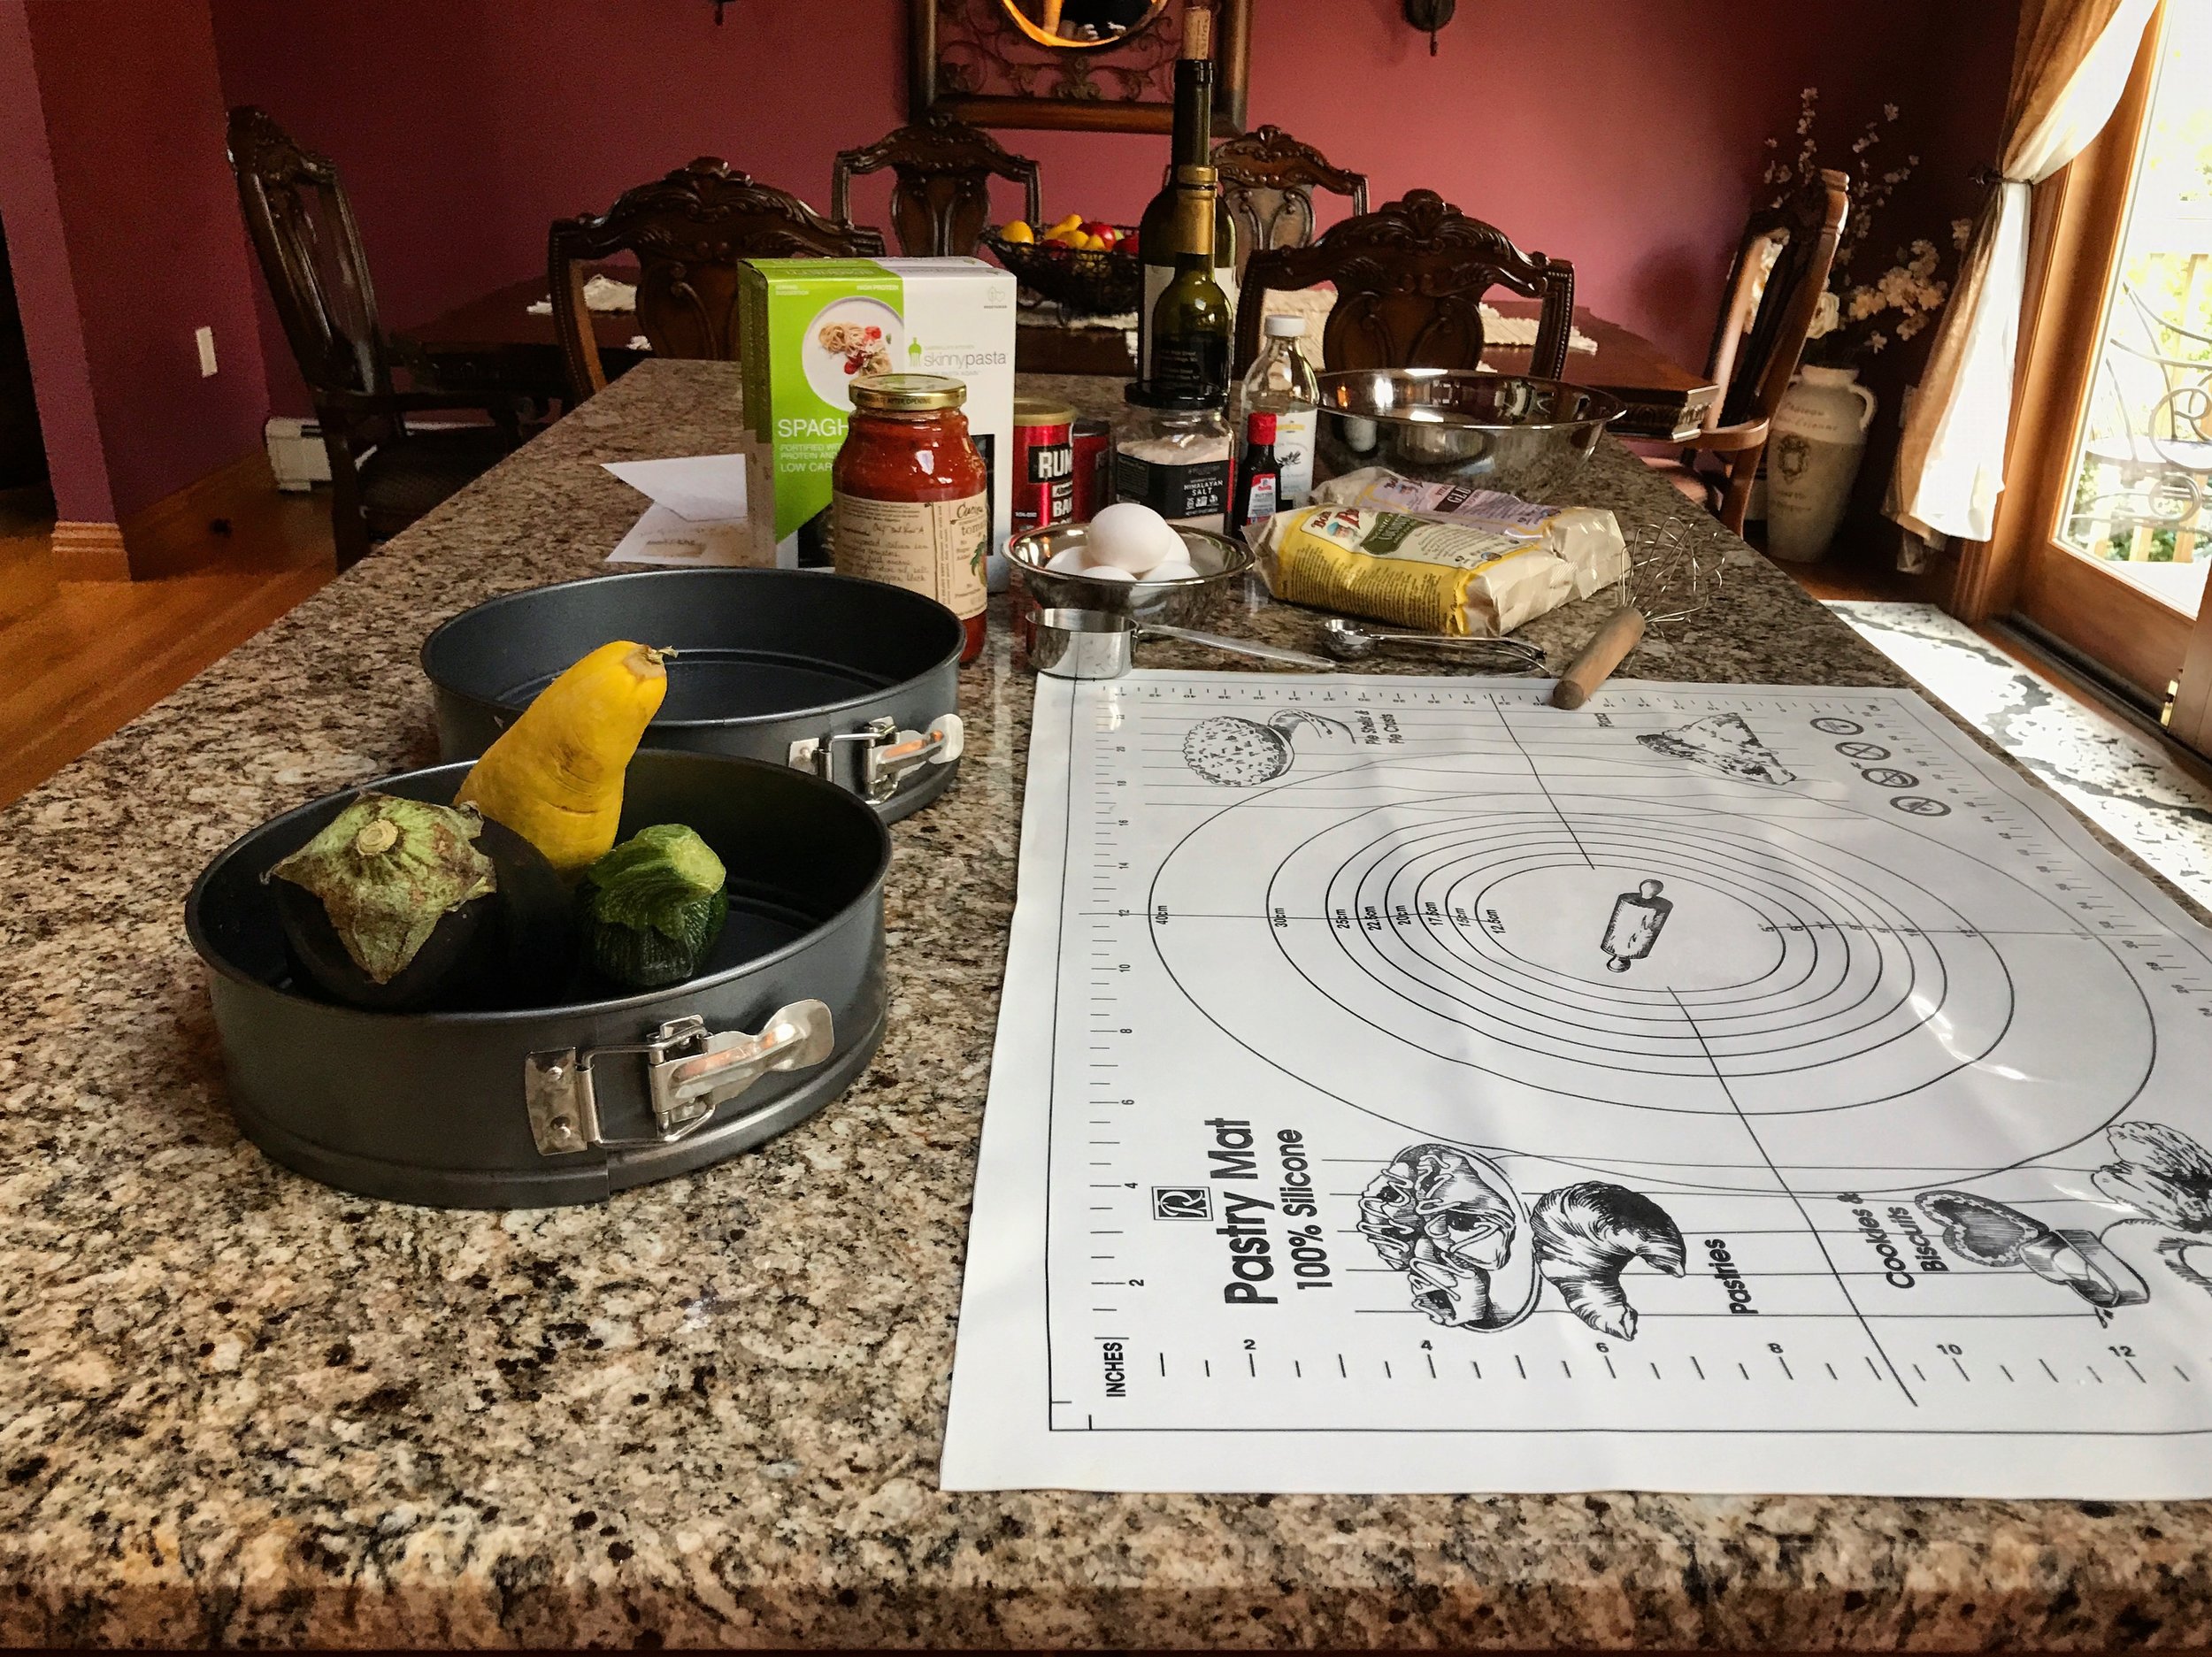
1/3 cup plus 1/4 cup extra-virgin olive oil
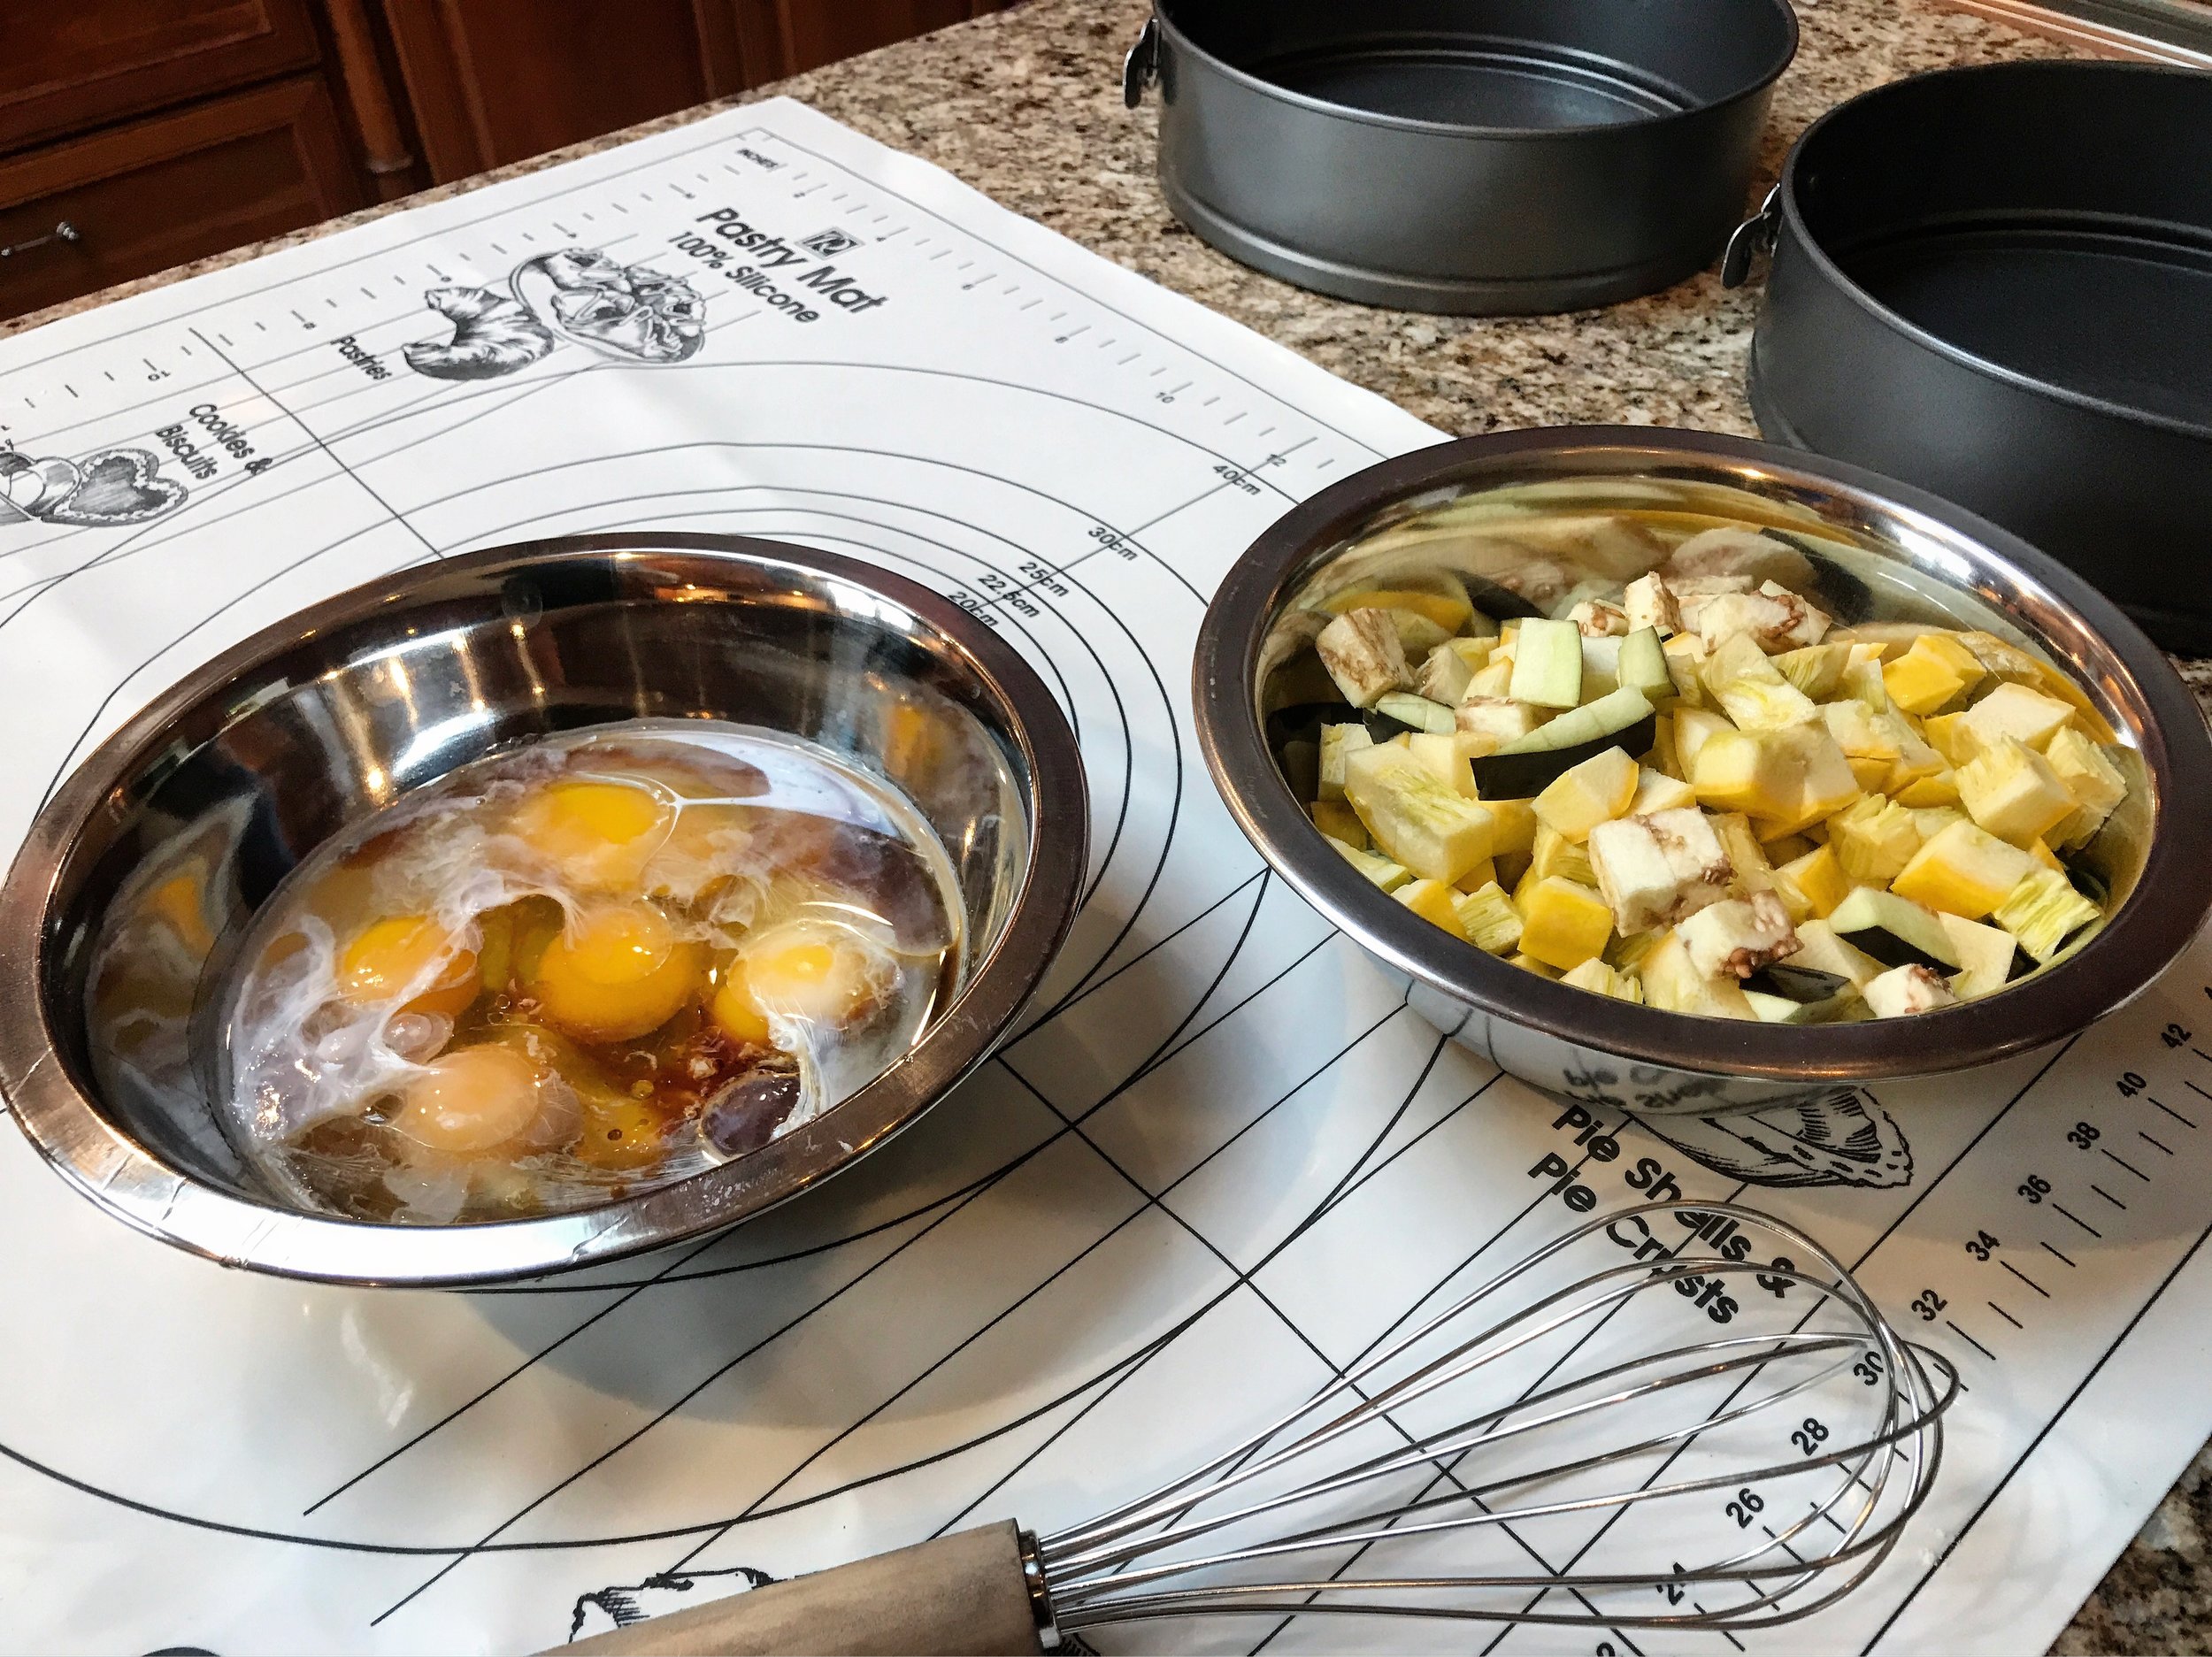
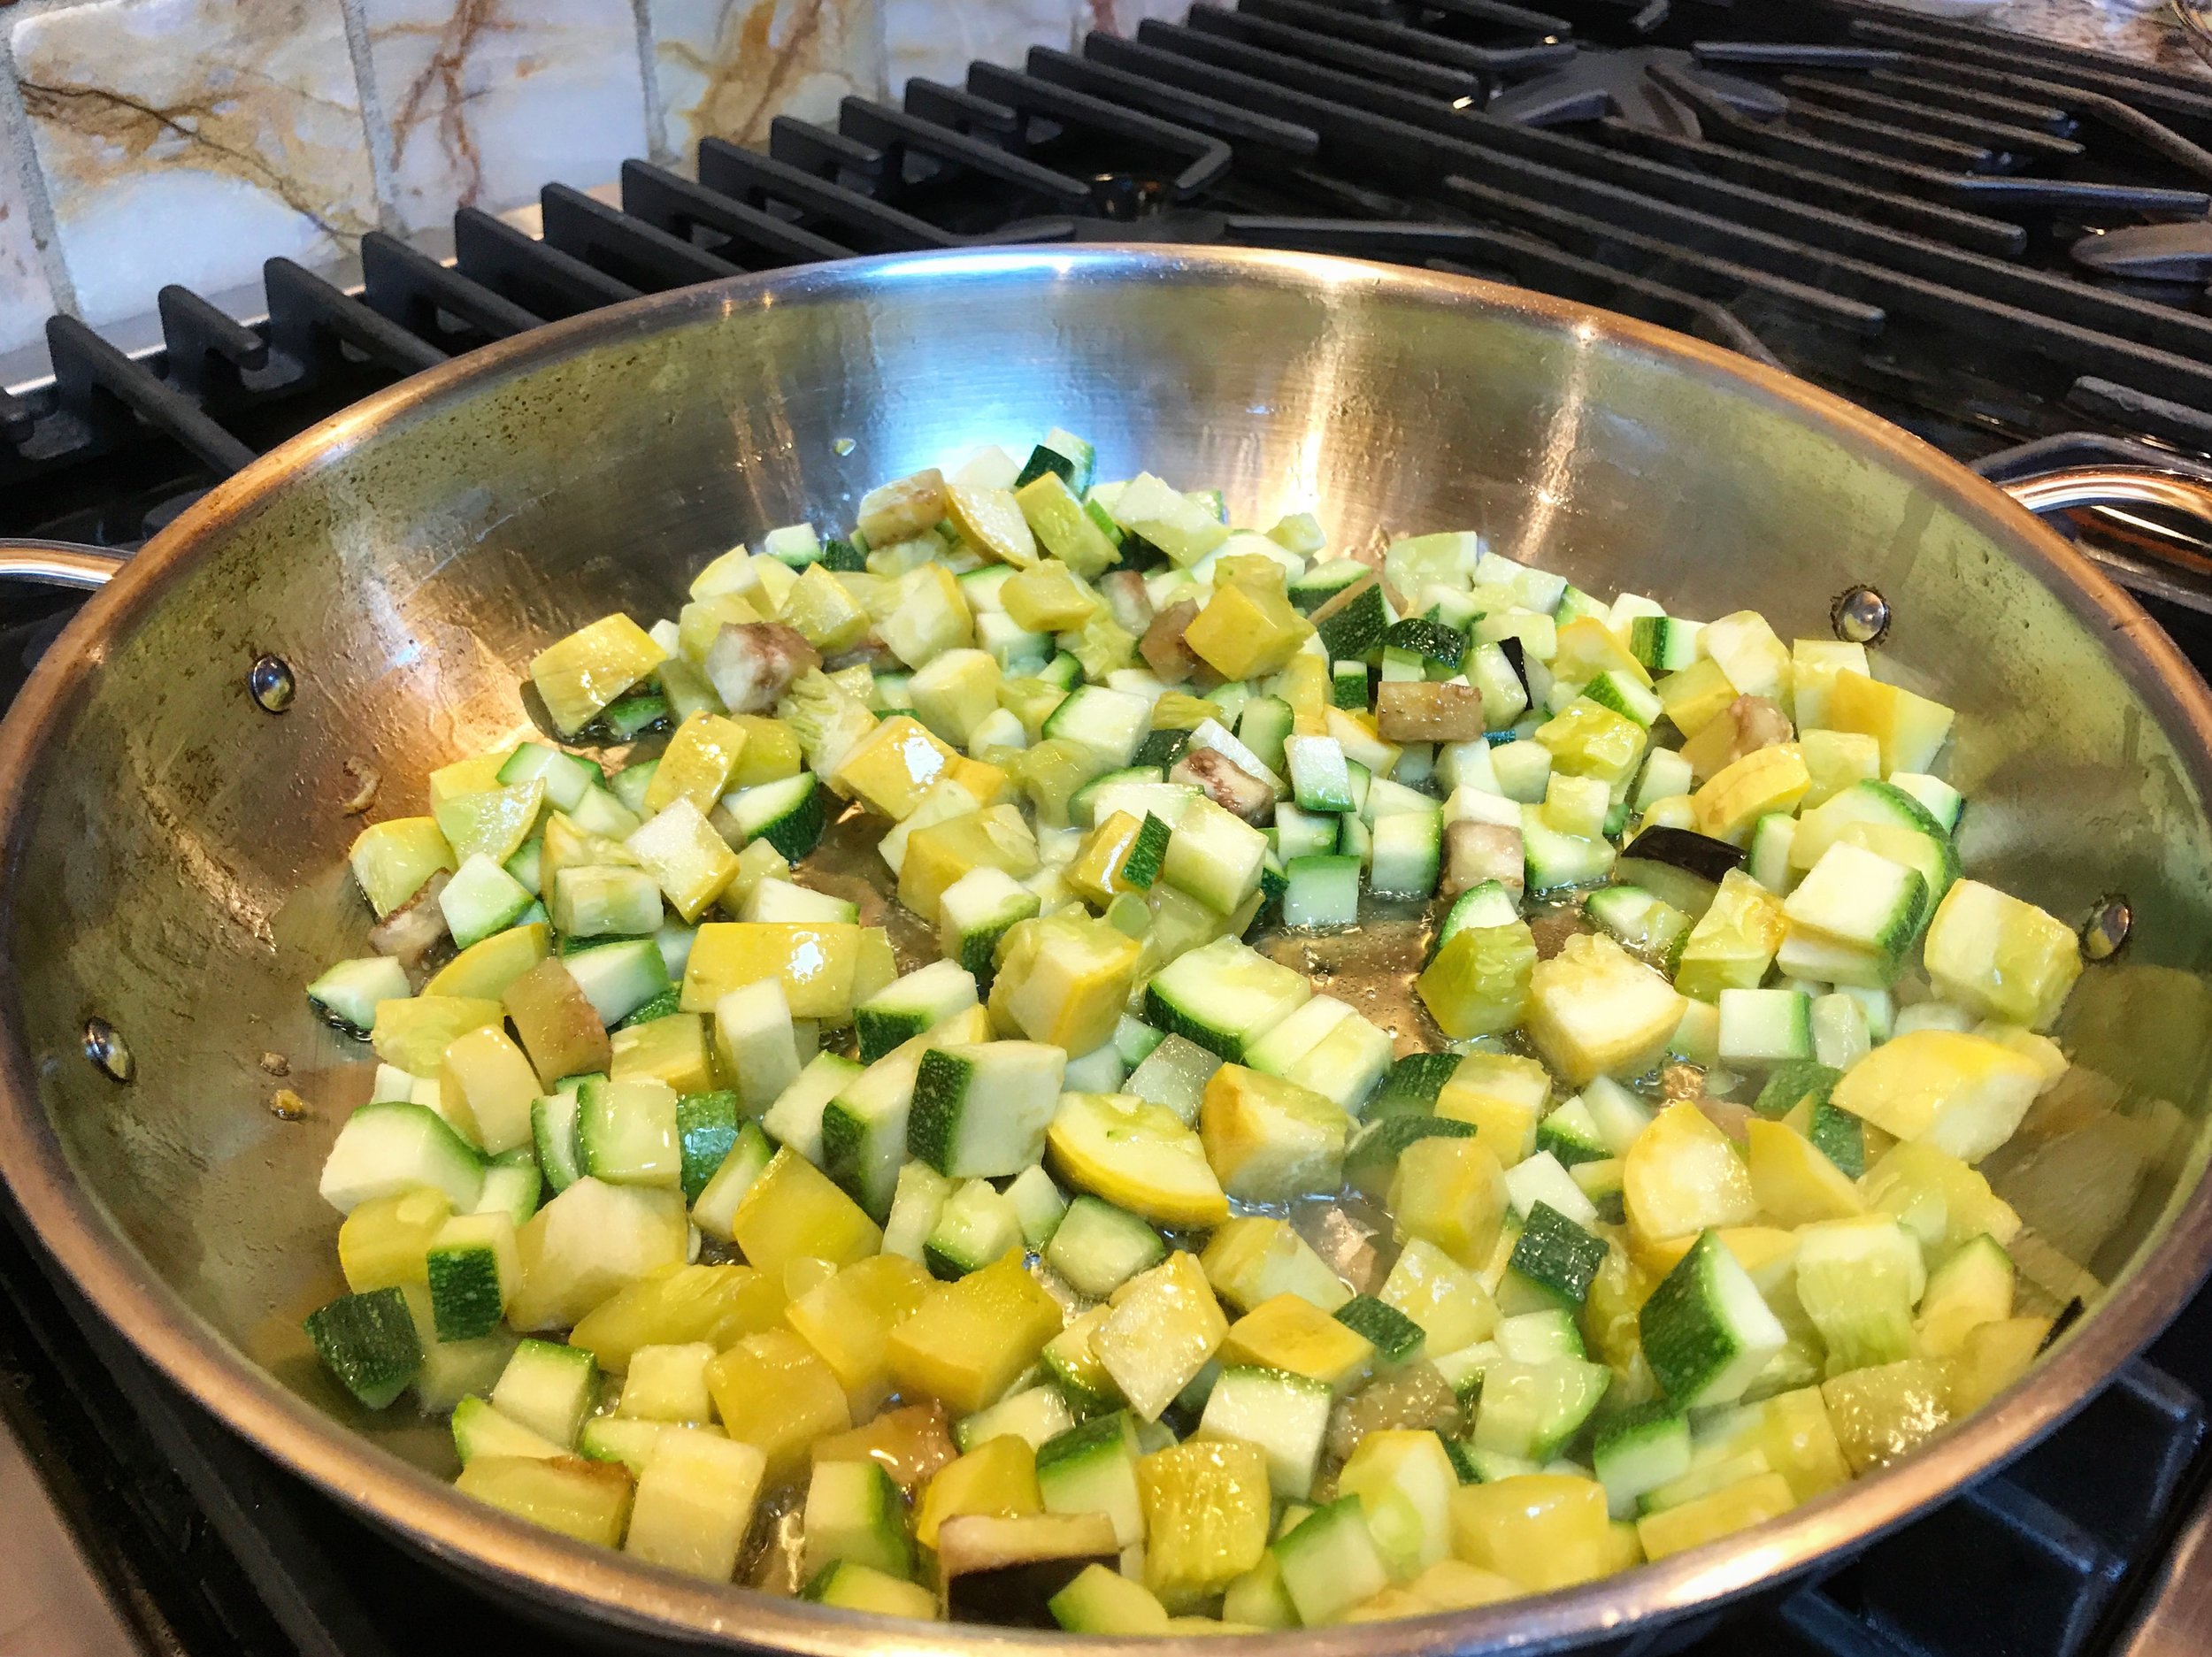
1 zucchini, large dice
1 yellow Squash, large dice
Sea Salt and freshly ground black pepper
1 tablespoon minced garlic
1 pound mild Italian turkey sausage, casings removed
1/4 cup red wine
3 cups tomato sauce (plus 2 more cups for serving on the side
1/2 teaspoon crushed red pepper flakes
2/3 pound GK SkinnyPasta, Spaghetti
1 pound part skim mozzarella, diced
1/2 to 2/3 cup Parmesan, Asiago & Romano cheese, shredded
1/2 cup or more part skim ricotta cheese
1 tablespoon Fresh chopped parsley
Coconut Flour Pie Crust (see recipe below)

Directions:
1. Heat  2 tablespoons cup of olive oil in a large sauté pan over medium-high heat. Add the vegetables and toss to coat in the oil..
2. Sprinkle with sea salt and pepper. Saute the veggies until it is lightly golden and tender, about 10 minutes. Decrease the heat to medium. Add the garlic and saute until it is tender, about 2 minutes longer..
3. Using a slotted spoon, transfer the vegetable mixture to a large bowl..
4. Add the sausage and wine to the same frying pan. Cook over medium-high heat until the wine evaporates and the sausage is brown, breaking the sausage into smaller pieces, about 8 minutes..
5. Add the sausage, parsley, tomato sauce, and crushed red pepper to the veggie mixture, and toss to combine..
6. Meanwhile, bring a large pot of salted water to a boil over high heat. Add the GK Skinny Pasta and cook for 1 to 2 minutes, stirring constantly..
Drain. Toss the spaghetti with the mixture. Cool completely. Add the mozzarella and shredded cheeses and toss to combine..
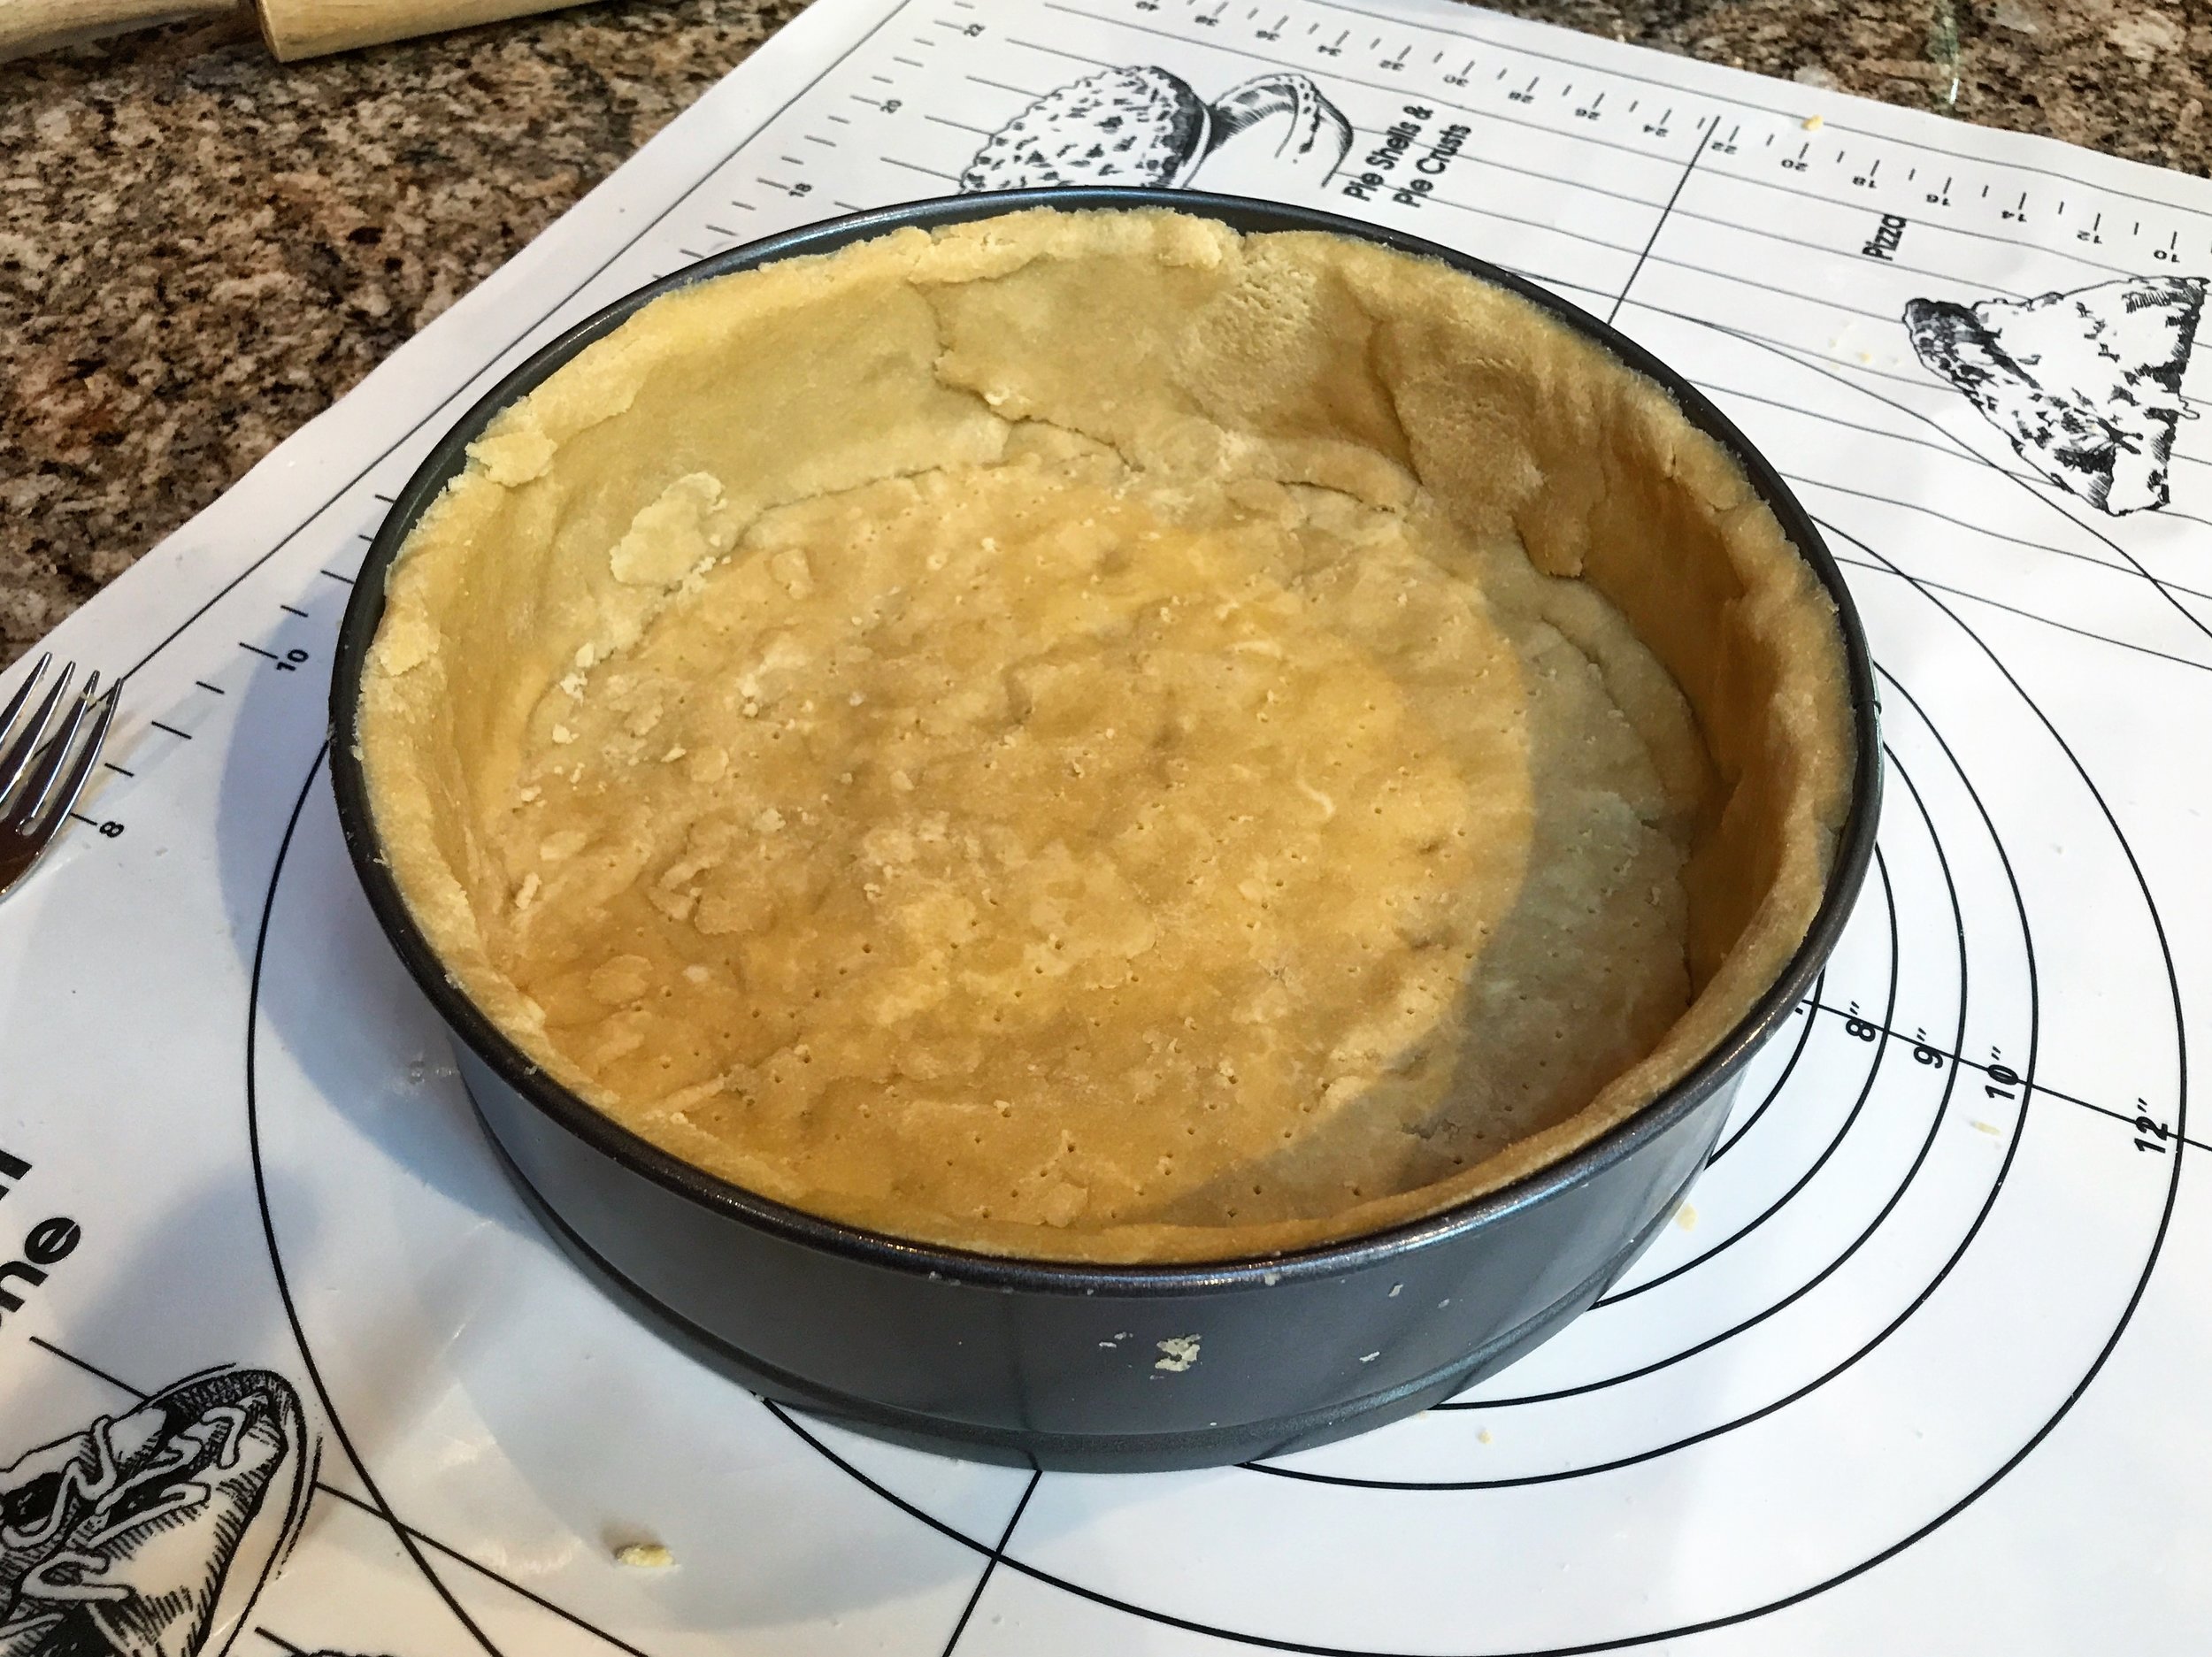
7. Preheat the oven to 375 degrees F. Follow the "Coconut Flour Pie Crust" directions and transfer to a 9 or 10 inch spring-form pan (I used a double recipe and 10 inch spring-form)
8. Spoon the mixture into the prepared bottom crust till full adding spoonfuls of part skim ricotta cheese here and there (more or less to preference)
9. Roll out a 10 inch circle of coconut flour pie crust on parchment paper, brush the exposed edges of the pie crust in the spring-form pan with egg wash and transfer the circle of dough on top sealing it by pressing the edges..
10. Lightly brush the top with egg wash and sprinkle a pinch or two of coarse salt on top—then cut small slots for the inside to vent..
11. Place in middle rack of the oven. Bake until the pastry is golden brown on top, about 30 minutes..
12. Use foil around the edges if they begin to darken to quickly..
13. When done let stand for 10 to 15 minutes. Remove the pan sides and serve with some reserved tomato sauce on the side..

Notes:
1. You can pre-bake the bottom shell of pie crust till just beginning to lightly golden, to avoid the chance of it remaining to soggy, before filling. Just be careful not to overcook..
2. You can also switch up the vegetables if you wish, I added a small amount of eggplant to mine. You can use all yellow or all green squash, all eggplant-it's personal preference really..

"Low Carb High Protein Coconut Flour Pie Crust"

Ingredients:
2 eggs plus 2 egg whites
2-3 teaspoons peanut or canola oil
1 teaspoon butter extract
1/4 tsp fine Himalayan pink salt
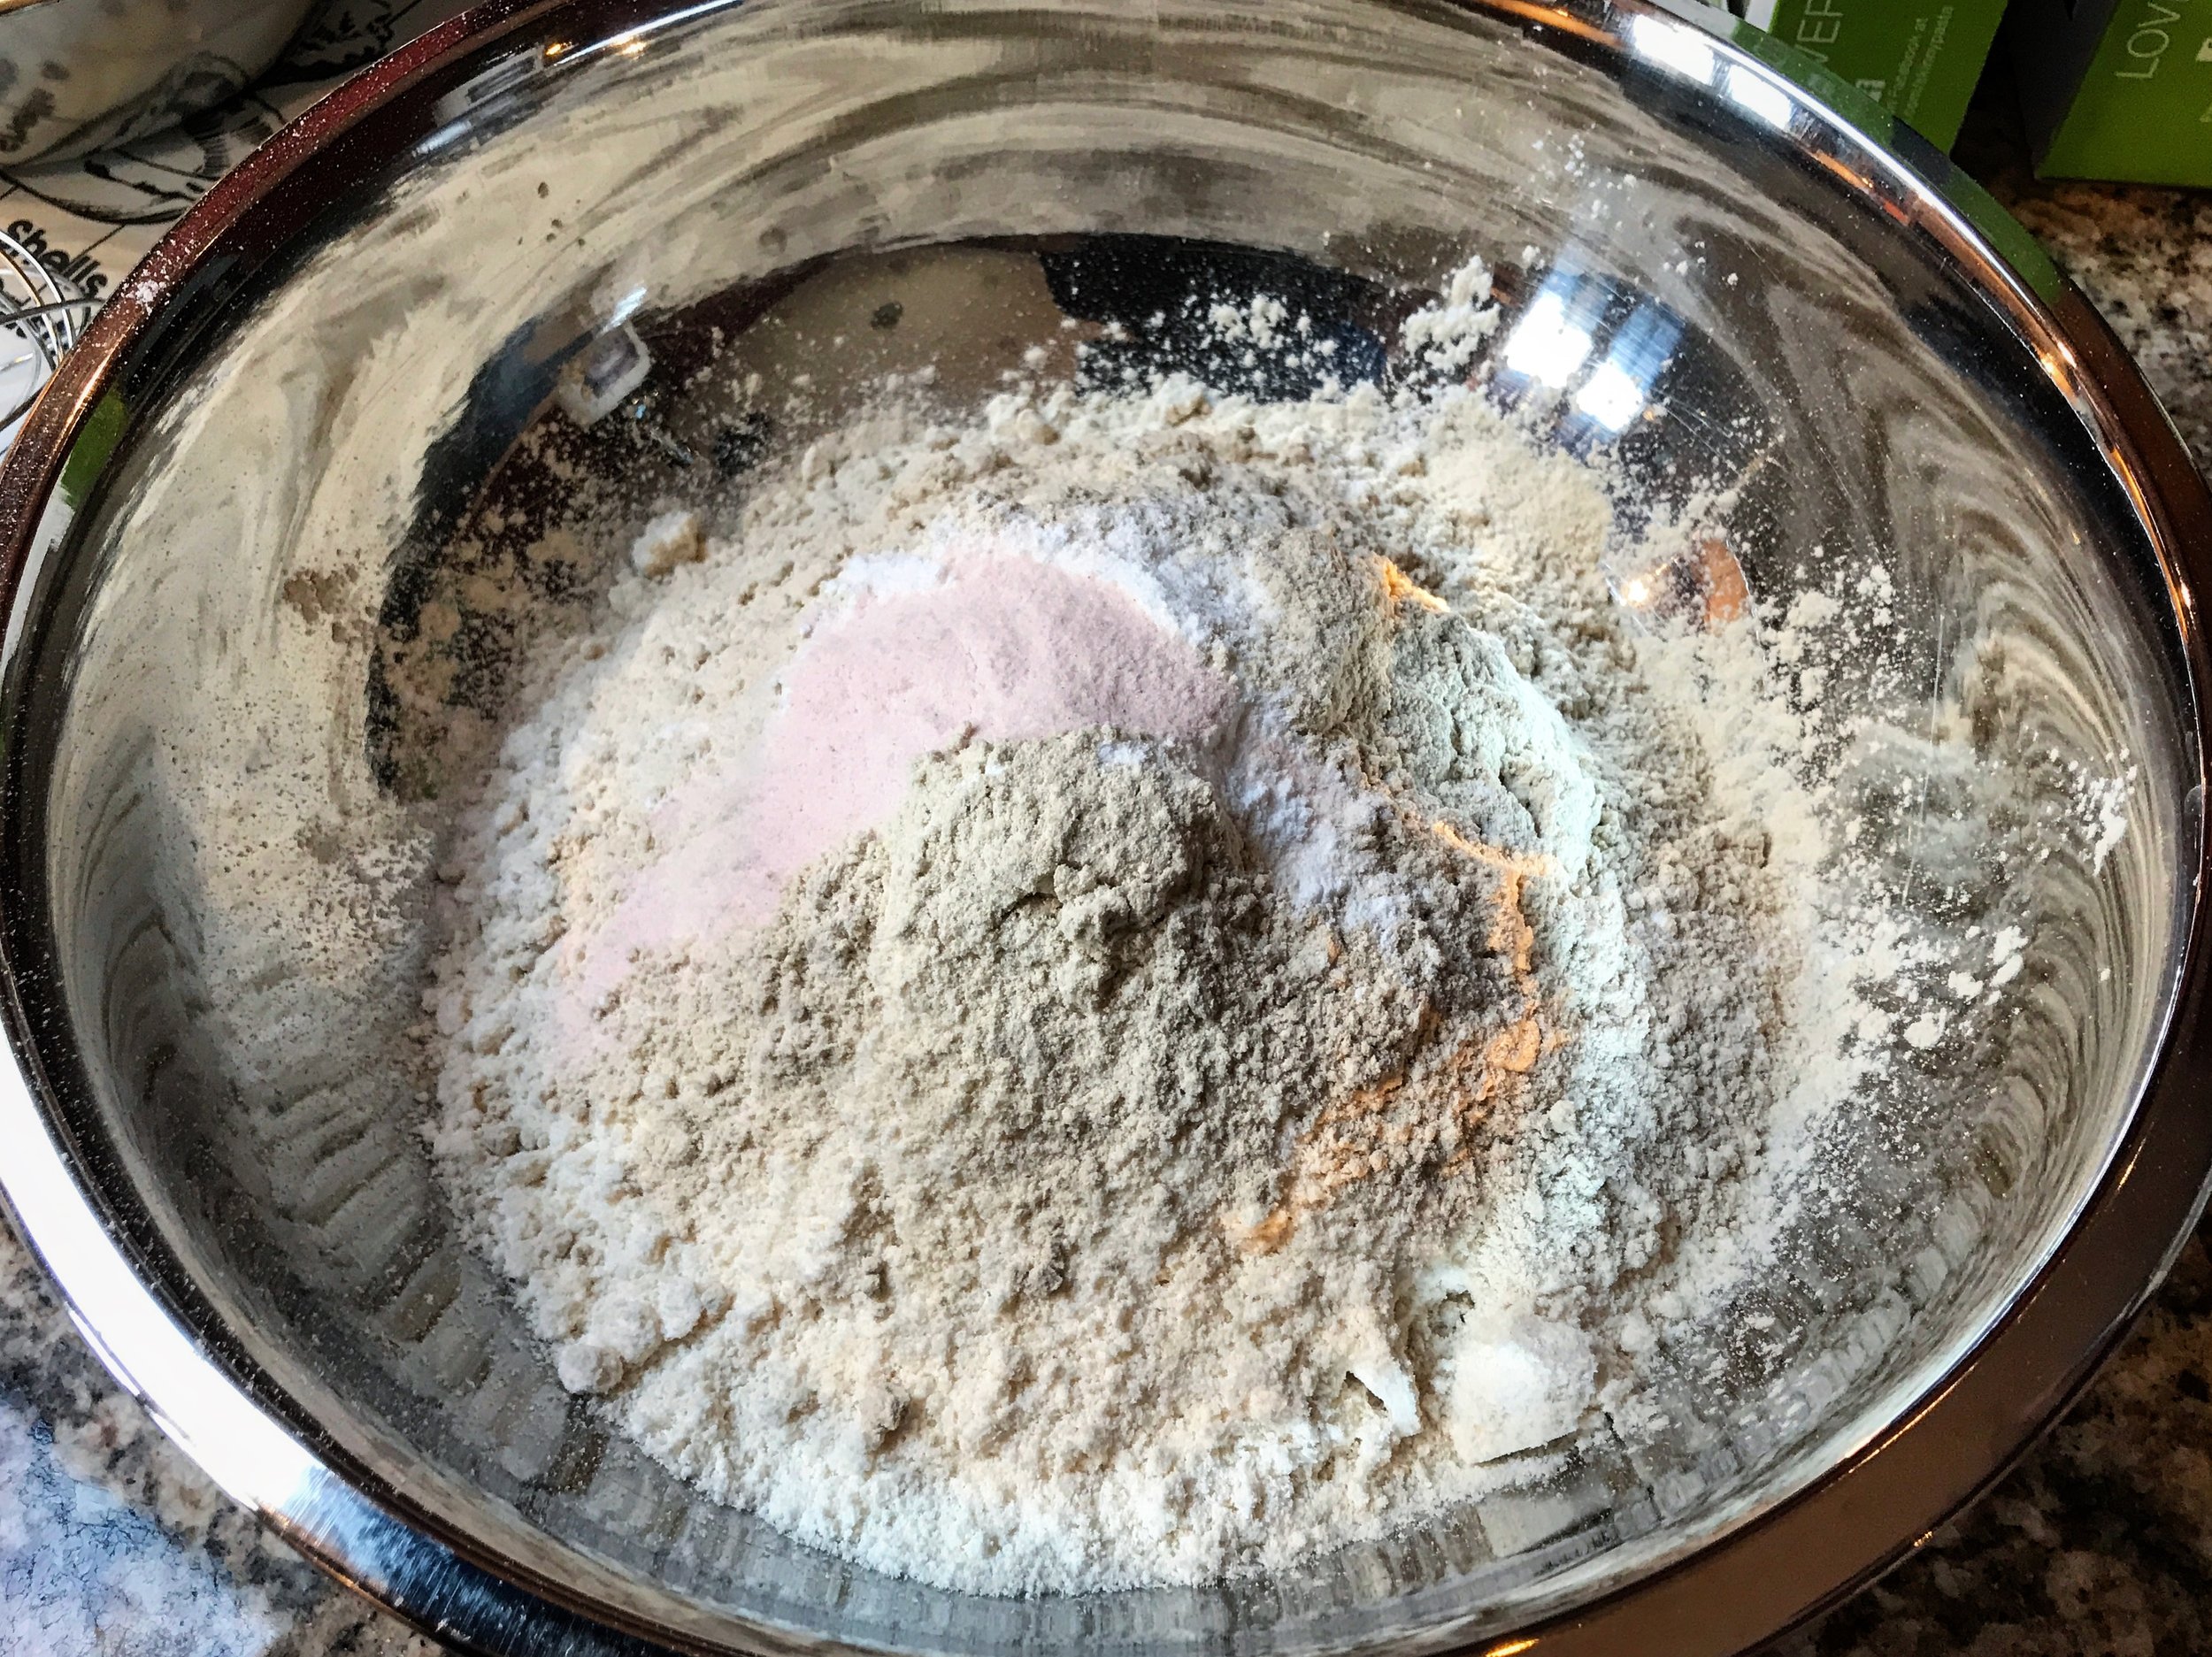
1/2 teaspoon baking powder
1 cup coconut flour (Bob's Red Mill or preferred brand)
1/4 cup Vital Wheat Gluten (24g protein per serving)
1/2 cup light butter, softened & added in spoonfuls (or cubes)

Options:
1 tsp vanilla extract (only for dessert pies)
3 teaspoons Truvia (for dessert pies)

Directions:
1. Preheat oven to 400 degrees F.
2. Whisk the eggs, oil & butter (vanilla extract & Truvia added here for a dessert pie recipe) into a stand mixer..
3. In another bowl whisk the remaining ingredients together until combined..
4. Pour the dry and wet mixture into a mixer and combine on low speed..
5. Add the cubed light butter. Process until it looks like crumbles..
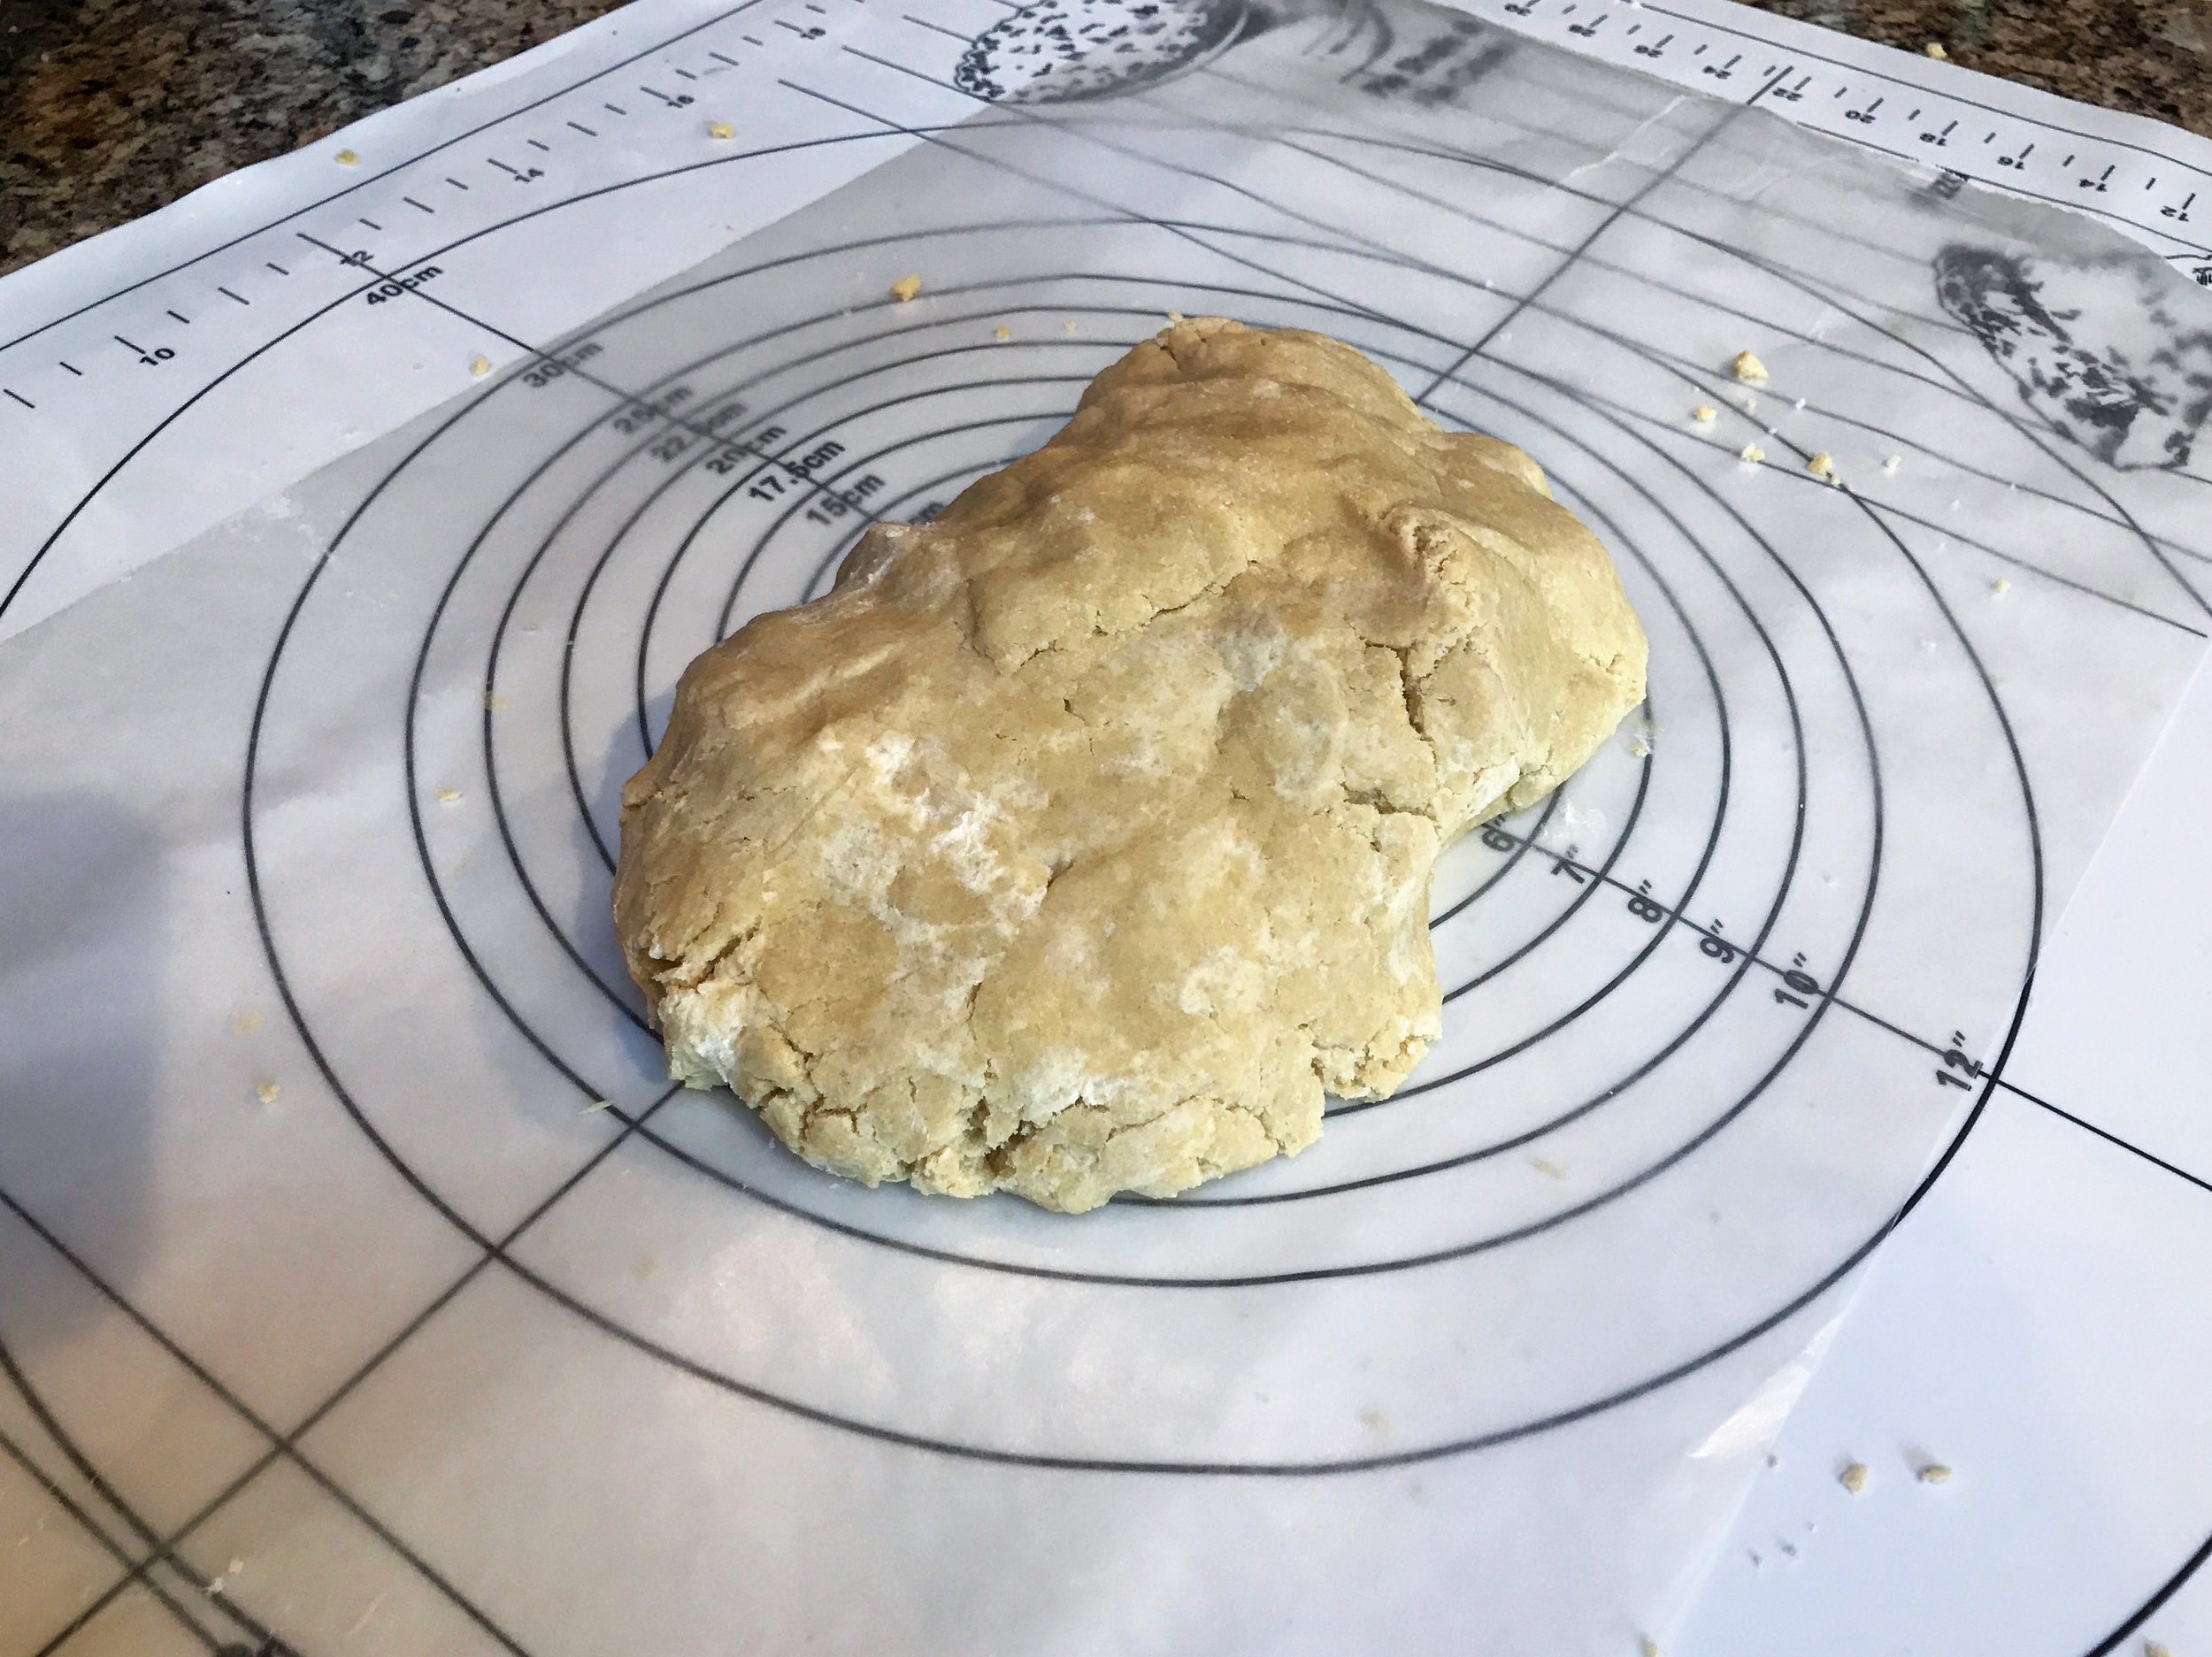
6. Squeeze the crumbles together with your hands until you form a ball of dough..
7. Roll out the needed dough between two pieces of parchment paper and flip over into pie plate or spring-form pan (will want to break, just use your hands to fill and form the dough inside)
8. Using a fork randomly make holes into the bottom of the crust using the tines..
9. Loosely ring the top edges of your dough with aluminum foil if you're going to do additional baking after filling..
10. Pre-Bake the crust 7 to 10 minutes or until lightly golden..
11. Once cooled out of the oven, add your filling. Or if you're doing additional baking, fill and add your additional layer of pie crust on top before baking again..

Notes:
1. For Gluten Free version you can try switching out the Vital Wheat gluten for unflavored brown rice protein..

2. You can also increase the sweetness of the crust by adding additional Truvia (or your preferred sugar substitute), Vanilla extract or other flavors depending on what you plan to fill the crust with. (Sweet or Savory works great with this crust)

"Healthy Faux PF Chang's Mongolian Beef" with "Noodles"

"Healthy Mongolian Beef with Ramen Substitute"

Every once and awhile I will see a picture, walk by an item or think of something and say to myself—"You know what, I just have to try that"

Recently I had experienced an almost cascading avalanche of these ideas an fixations as a plethora of thoughts went tumbling through my mind...


"Blue Orchids"

It all started, simply enough, with a discussion of ramen noodles and how I first got into cooking as a kid by playing around with the seasoning and cooking method of this simple, cheap staple of college students and kids practically the world over...

Shortly after this; and with the thoughts of ramen still percolating through my subconscious, like magic, I wandered across the image of an Asian beef dish while skimming an article which included, amazingly enough, ramen noodles...

"Faux-PF Chang's Mongolian Beef with Ramen"

It was then that I truly began to get intrigued. I mean, I haven't had ramen in so long but maybe just maybe it'd be worth it—still I wasn't sold just yet...

Finally as I walked the aisles of my local market I passed, in the freezer case, what just happened to be the exact same beef dish I had just seen in the article—"PF Chang's Mongolian Beef"

This is what finally set off the shock-wave within my brain causing my thoughts to begin that headlong rush, that unstoppable tsunami, which would culminate in the creation of a new landscape and, I hoped, a new recipe worth sharing...


"Descending"

I began researching and almost gave up the journey; the carbs, the sugars, the sodium was just massive—I mean I just don't eat like that anymore, being on the wrong side of "40" and all that...

It was then I said to myself that it must have been "kismet" or "serendipity" that brought me here through this congruence of events, that the universe itself must be telling me to look further into this and not give up so easily—that just maybe I could find a better way to a better recipe...

And I did...


Using every trick in the book, and a few I didn't even know where an option, I eventually came up with what so closely resembles the flavors and textures of "PF Chang's Mongolian Beef" but with a vastly healthier list of ingredients and all of it finished off with my newest, favorite noodle substitute—the "Miracle Noodle" or "Shirataki Noodles"

None of the fat, sugar or heavy starches of the ramen dish I first saw but with all of that amazing flavor. Try it out yourself; I think you'll find that it is, most assuredly, oh so
"Definitely Delish"

"Healthy Mongolian Beef"

"Healthy Faux-PF Chang's Mongolian Beef" with "Noodles"

Ingredients:
1 1/2 lb lean Sirloin, sliced/cut small (I used lean Filet Mignon cuts)
2 tbsp Cornstarch
2 tablespoons Coconut oil
1 Bell Pepper, sliced into thin strips (I used a mix of Orange and Yellow)
3 Green Onions, chopped
2 tbsp Rice Wine Vinegar
1 package Angel Hair Miracle Noodle (Shirataki Noodles)

For Sauce:
2 tbsp Toasted Sesame oil
1/2 cup Tamari Lite Japanese Soy Sauce
3-4 tbsp Truvia Brown Sugar Blend
1 1/4 cup low sodium fat free chicken broth
5 cloves fresh Garlic, minced
1/4 tsp red pepper flakes

"21day Fix Mongolian Beef"

Directions:
1. Slice the lean beef into small thin pieces against the grain, pat dry with paper towels. Then place the beef in a medium sized bowl with the cornstarch and mix together to lightly coat...
2. Prepare your "Shirataki Miracle Noodles" by first rinsing them off in a colander for 2 minutes under warm water. Then place them in a small pot of water and bring to a boil, cooking for 3 to 4 minutes. When ready drain in the colander and rinse again for 30 seconds under warm water. Finally place drained noodles in a large non-stick pan and cook on medium heat, without oil, for approximately 8 to 10 minutes to dry and toughen up the noodles, being careful not to overcook...
3. In a wok, or non stick skillet, heat the 1 tablespoon of the coconut oil on medium to medium-high heat. When the oil is hot, add beef and cook until browned on all sides. It will take 2 to 3 batches because you want the beef to brown without sticking together. Also add another tablespoon of coconut oil after the first batch and feel free to add more if needed...
4. Remove beef from the wok to a plate, covering with foil and then add the 2 tablespoons of rice wine vinegar scraping up any brown bits stuck to the pan...
5. Add the bell pepper and saute it for a couple minutes just until it begins to soften. Remove the pepper from the skillet to a plate and set aside.
6. In that same skillet add all of the sauce ingredients, the sesame oil, tamari soy sauce, truvia brown sugar, garlic, chicken broth and red pepper flakes. Stir and cook over medium heat until sauce thickens a bit and reduces by about a quarter. It can take up to about 10 minutes until the sauce thickens and reduces. You don't want to reduce it by too much because you want enough sauce to coat the noodles and beef...
7. Return the beef and bell pepper to the skillet and toss in the sauce. Add the cooked shirataki miracle noodles to the wok and toss everything together. Top with sliced green onions and serve while hot...

"Window on the Wetlands"

"Mexican Inspired Lasagna"

"Tex-Mex Lasagna"

This "Mexican-Inspired Lasagna" was not only for me and my Baby to try out and enjoy the other night, but it just so happens to be a shout out to all her friends who've been caught by the fitness bug now that they're all Beachbody coaches...

So, to help them all out I decided that I would try, on occasion, to come up with some recipes to share that would help them all on their fitness journeys.

"Mexican Inspired Lasagna"

Now, after having carefully crafted a few lo-fat Shakeology Gelato's, along with some Shakeology Muffins and Marble Cake-it's now time to get to the heartier fare...

What could be heartier then beans, and this recipe doesn't disappoint. Being a mix of black beans, pinto beans and white meat chicken-the cheesy, salsa layered goodness fills your stomach without worry of breaking your 21 day fix routine...

"Quiet Southern Beauty"

Low fat, low carb and full of good proteins and fiber; this happy union would be totally at home among a Tex-Mex themed summer barbecue or any dinner time, regardless of the season...

Serve it up with some sour cream, guacamole, sliced avocado and picante sauce for a delicious, healthy meal that can't be beat. Try it for yourself, I think you and your family will find that it is, most assuredly, "Definitely Delish"


"Healthy Mexican Inspired Lasagna"

"Mexican Inspired Lasagna"

Ingredients:
4 cups Chicken breast, roasted & shredded (2 rotisserie chickens)
2 (16 oz.) jars Chunky Salsa (homemade or favorite brand choice)
1 cup Pinto beans, drained & rinsed
1 cup Black beans, drained & rinsed
1 (7 oz.) bag 2% Sharp Cheddar, shredded
1 (7 oz.) bag 2% Mexican Mix Cheese, shredded
1 (14 oz.) can Fire Roasted Diced Tomatoes, drained
1 teaspoon Onion powder
2 tablespoons Chili powder blend (see below for recipe, or use favorite pre-made)
2 packages Damascus Bakery Flax Roll-Ups (see notes)
Sea Salt & Black Pepper, to taste
Low fat Sour Cream, for serving
Fresh Cilantro leaves, torn for garnish

"Layering the Deliciousness"

"Layering the Deliciousness"

Directions:
1. Pre-heat your oven to 350 degrees Fahrenheit and take out a 9 x 13 inch baking pan or dish and grease the insides with butter or a non-stick baking spray...
2. Take cooked rotisserie, or roasted, chicken and shred the white meat, placing into a large bowl for mixing. Season with Chili powder blend, onion powder, and sea salt and pepper to taste, until evenly coated. Then set aside till ready to use...
3. Next take the flax roll ups and cut them into 3 even width strips across the short sides of the roll ups, these will make up your "lasagna" noodle substitutes. You should end up with 16 strips approx. 9 inches by just over 3 inches in size...
4. Now, in a bowl, mix together the 2 jars of chunky salsa with the can of drained fire roasted tomatoes. In a second bowl, mix the two bags of low fat cheese together in preparation...
5. To begin layering, start by ladling out 2/3 of a cup of salsa evenly into the bottom of your baking dish (I'll usually give the tray a few shakes back and forth to help spread the salsa). Then cover it with 4 strips of the cut flax roll ups...
6. Cover the 4 strips of flax roll ups with about 1/3 of the chicken, spreading it evenly. Follow that with 1/3 of a cup of the black and 1/3 of a cup of the pinto beans. Cover that with a 2/3 of a cup of the salsa and tomatoes, then 1/4 of the total amount of shredded cheese...
7. Repeat with another layer of roll ups strips, chicken, beans, salsa and cheese until only salsa and cheese remain...
8. After laying down the last 4 strips, cover them with 2/3's of a cup of salsa and the remaining cheese...
9. Place into the oven for 25 to 30 minutes, until warmed through and the cheese is melted and golden brown. Serve with low fat sour cream, avocado slices, torn cilantro leaves and remaining salsa or picante sauce...

"Southern Sunrise"

Notes:
1. I use the Damascus Bakery Flax Roll Ups for this dish because of the higher protein and fiber, with low calories. (Each Roll Up is 110 cals, 3 g fat, 15 g carbs, 9 g fiber & 12 g protein)
This helps to keep the overall fat and carbs low while raising the fiber and protein a nice amount without affecting the taste...


"Chili Powder Spice Blend"

Ingredients:
2 tablespoons Ancho chili's, ground into powder
1 tablespoon Turkish Cumin, ground
1 tablespoon Mexican Oregano, dried
1/4 teaspoon organic Cayenne powder
1/2 teaspoon Mexican Cocoa powder
1/2 teaspoon organic Onion powder
1/4 teaspoon Hungarian Paprika (I use Szeged brand)
1/2 teaspoon Coriander powder

"Mexican Lasagna with Mango Rose"

"Mexican Lasagna with Mango Rose"

Directions:
1. Combine all of the ingredients in a small mason jar with a tight fitting lid, shake until evenly mixed and store in a dark cupboard till ready to use...