"Iron Skillet Chicken Pot Pie" With "Cheesy Beer Bread Biscuits"

It being such a cold and wet day in New York, with the damp chill soaking into my bones and making it one of the ickier days this month so far—I decided that what was needed here was some good old comfort food...

Taking out an oldie but goody of a recipe, I decided to play around and see what I could do to liven it up a little and truly make it a "stick your bones" dish to warm the soul on a blustery winters day...


126.JPG


Grabbing an armful of staples floating in fridge and freezer, I got down to work; from the rotisserie chicken (always try to keep one on hand) and the variety of fresh and frozen vegetables, I proceeded to shred, chop, slice and dice to my hearts content...

Making a simple gravy, I tossed it all together with some seasonings and poured it into my trusty cast iron skillet...

Time for the all important top to my take on the classic chicken pot pie. For this I decided on a cheesy beer bread biscuit dough, full of ale and yummy cheddar cheese...

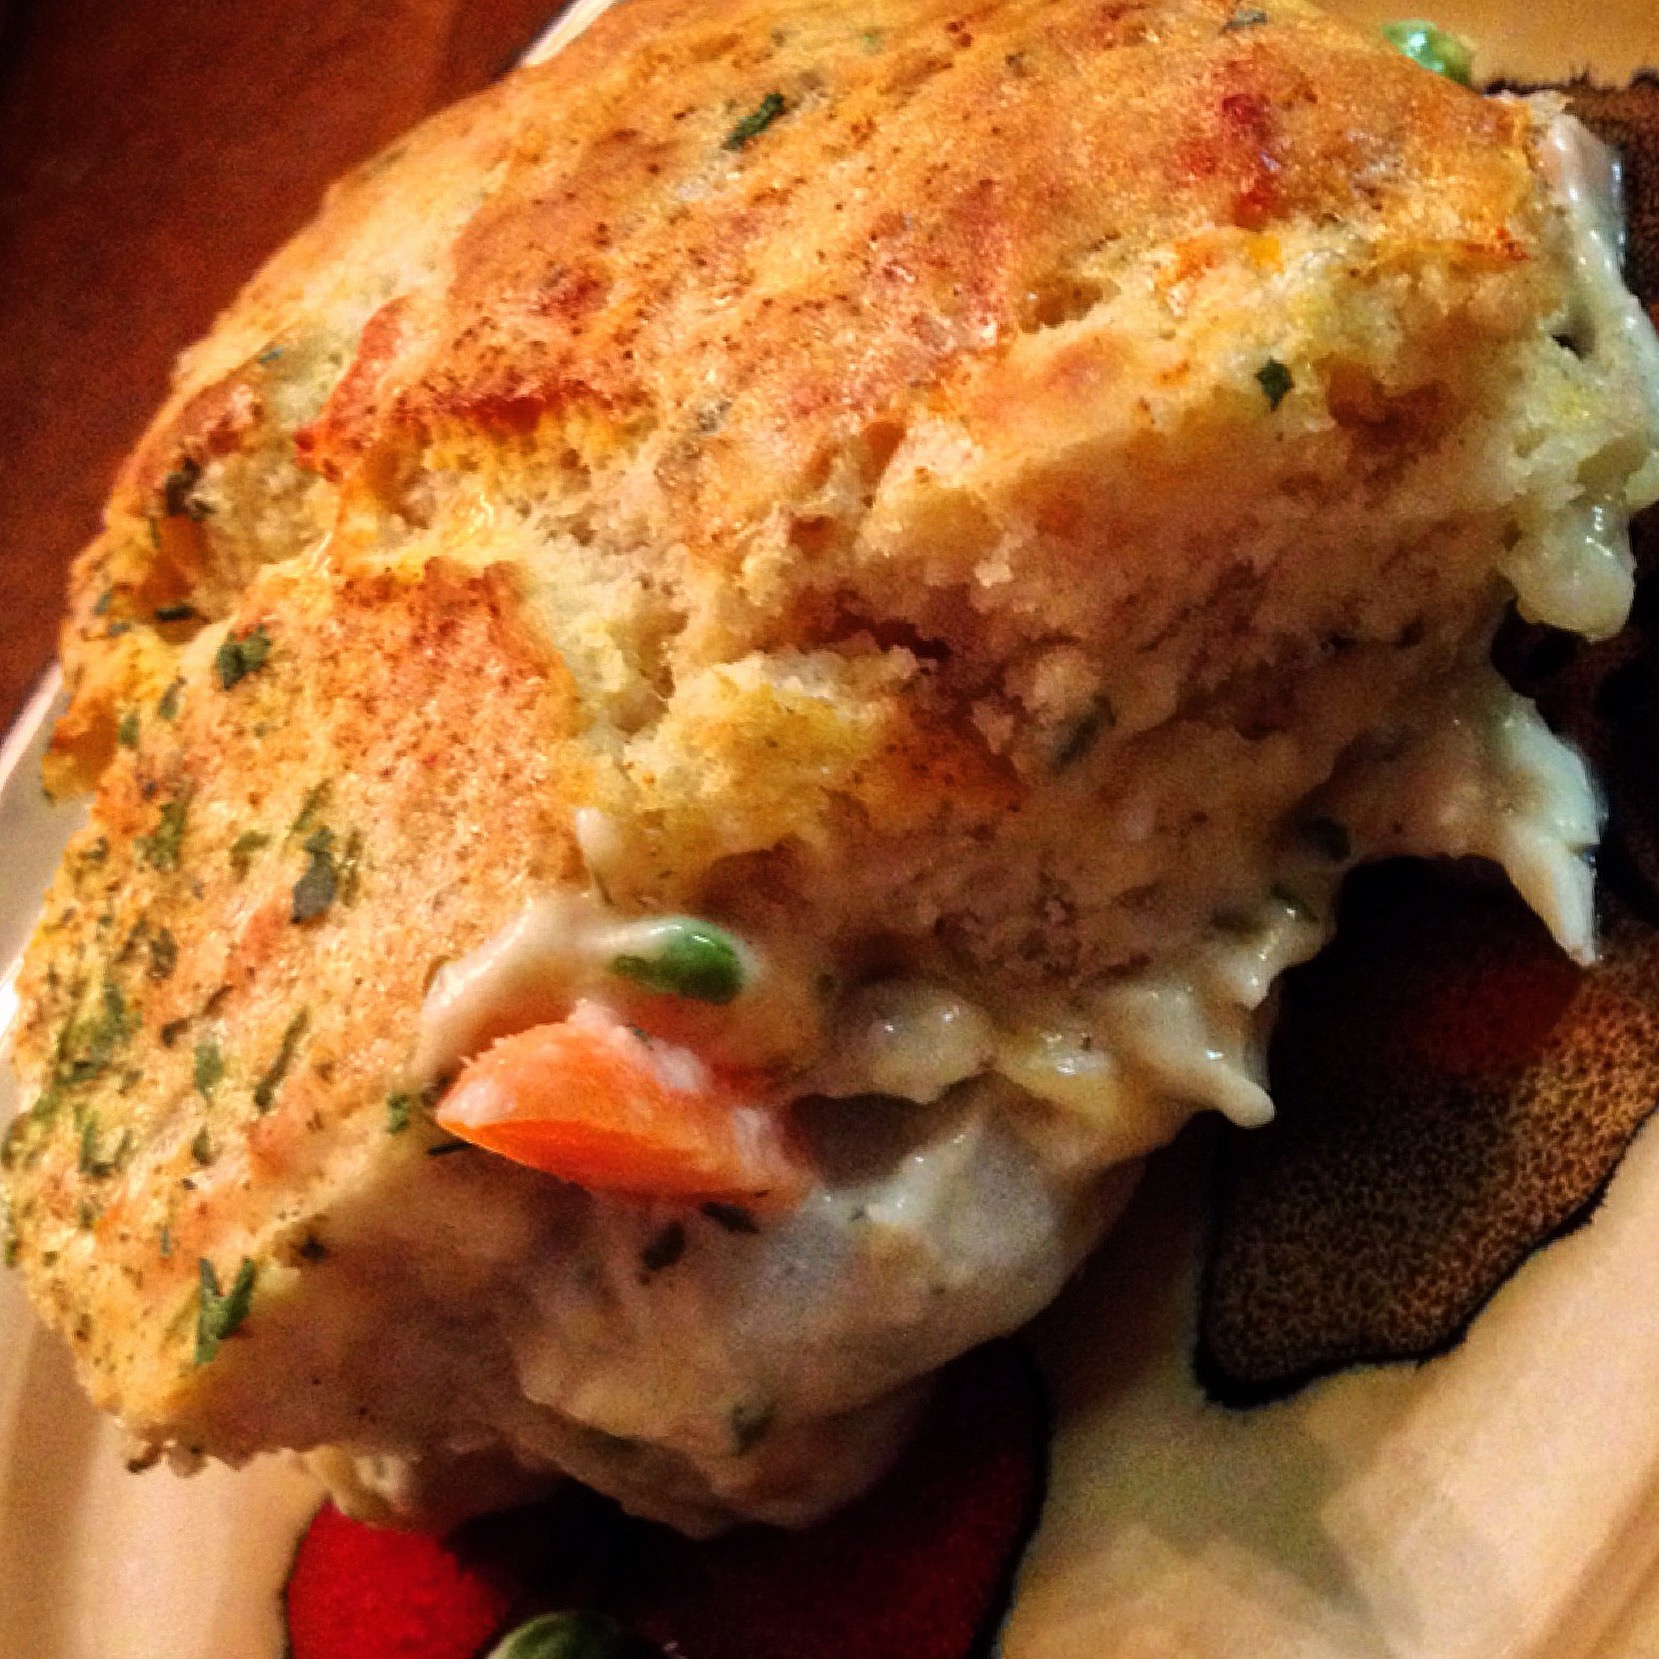
Taking the basics of a beer bread mix, throwing in the cheese, beer and seasonings—I then scooped it into little biscuit shapes and dropped it on to the filling inside the skillet...

In the oven to bake and before long the wonderful smells start to permeate the house and then—lunch...

Definitely a perfect, quick and easy meal to make and serve on a cold day using what's on hand—and, oh so, "Definitely Delish


"Iron Skillet Chicken Pot Pie" with "Cheesy Beer Bread Biscuits"

Ingredients:
Filling:
1 rotisserie chicken, meat removed & shredded
1/2 cup frozen pearl onions, more if desired
1 cup frozen peas & carrots (can mix and match vegetables, add corn, etc.)
1 cup reduced sodium chicken broth
1 cup low fat milk
2 tablespoons cornstarch
1/2 teaspoon sea salt
1/4 teaspoon white pepper
1/4 teaspoon poultry seasoning blend
1 teaspoon fresh chopped Italian parsley
1 tablespoon of olive oil

FullSizeRender[1].jpg

Biscuit:
2 1/4 cups Bisquick mix (If you have beer bread mix, then use)
2/3 cup brown ale (I used Newcastle ale)
1/2 teaspoon fine minced garlic
1/2 teaspoon minced onion
1/4 teaspoon fine sea salt
1/2 teaspoon finely chopped chives
1/4 teaspoon garlic powder
1 cup shredded cheddar cheese
1 stick of softened butter
2-3 tablespoons milk or cream, as needed (optional)
1 tablespoon of melted butter, separate

Directions:
1. Pre-heat oven to 400 degrees Fahrenheit...
2. To make the filling; whisk together broth, milk, cornstarch, sea salt, poultry seasoning and pepper...
3. Bring to a boil, stirring, until sauce thickens. Stir in your shredded chicken and mixed vegetables—return to a boil, then remove from heat...
4. To make the biscuits add all of the ingredients to a bowl except for the milk and ale. Mix together well, then slowly add the ale until fully incorporated. If mix is to dry, add 1 tablespoon of milk or cream at a time till desired consistency is reached...
5. Take a cast iron skillet and add 1 tablespoon of olive oil and using a brush or paper towel coat the inside of the skillet...
6. Add the fresh parsley to the filling and stir, then pour the heated filling ingredients inside your prepared skillet (or baking dish)
7. Next drop small biscuit sized amounts of the dough on top of the chicken mixture, making around 12 biscuits (I did slightly more, you can do slightly less as well)
8. Using a basting brush, brush tops of biscuit dough with the melted butter—and then place into the oven to bake...
9. Bake for approximately 18 to 22 minutes, until tops of the biscuits are a nice golden brown color and the filling is bubbly...
10. Remove for the oven and let sit for 10 minutes before serving...

Notes:
1. Any leftover biscuit dough can be dropped onto a parchment lined baking pan and cooked separately and saved in the fridge for up to 5 days...
2. You can mix and match vegetables, add corn, green beans, more onions, fresh or frozen—truly whatever you desire, or find in your fridge, freezer or cupboards...

"Pan Fried Gnocchi In Brown Butter Sage Sauce With Pumpkin"

Not quite ready to let go of the Fall season after the Thanksgiving holiday here in the U.S.

I know, I know. We all look forward to those Winter holidays; whether it's for the presents, the snow or the camaraderie—me though, I love Fall and this year it seemed to pass all to quickly...

So as the months prepare to change and all the craziness of December shopping, cooking and running around gets prepared to start—I decided to treat myself to one more dish full of pumpkin, an spice and everything nice...

Hope you'll enjoy it and hope as well that you all have a very blessed and happy holiday season whatever you and yours may celebrate...


"Pan Fried Gnocchi" in a "Brown Butter Sage Sauce" with "Pumpkin"

Ingredients:
For the Gnocchi:
1 pound Gnocchi (Store bought or see Recipe in Notes)
3 Tbs. unsalted Butter, cut into 3 even pieces
2 tablespoons of Extra Virgin Olive Oil
1 teaspoon Sea Salt
For the Sauce:
12 Tbs. unsalted Butter, cut into 1-inch cubes
10 large fresh Sage leaves, half of them minced
1 cup Pumpkin Puree
2 tablespoons Dark Brown Sugar
1/2 teaspoon of Pumpkin Spice
Fine Sea salt & freshly ground White Pepper to taste
For the Garnish:
Fresh Pumpkin Seeds
1 tablespoon of Cinnamon Sugar
1-2 teaspoons of butter or oil-optional
Fresh chopped parsley or sage for garnish-optional

Directions:
Cook the Gnocchi:
1. Bring a large pot of well-salted water to a boil over high heat. Add about one-third of the gnocchi..
2. To get the gnocchi into the boiling water, fold the parchment ends to form a chute and gently shake the gnocchi out, taking care not to clump them together as you drop them in..
3. Give one gentle stir, wait until the gnocchi all float to the surface of the water, and then cook them for 1 minute..
4. Meanwhile, heat 1 Tbs. of the butter, and 2 teaspoons olive oil in a 12-inch nonstick skillet over medium-high heat..
5. When the butter is completely melted, use a large slotted spoon or a strainer to transfer the cooked gnocchi from the boiling water to the skillet, shaking off as much water as possible first. The gnocchi should form a single layer in the skillet. (If the butter is melted before the gnocchi cook, take it off the heat; if the gnocchi cook before the butter is fully melted, it’s fine to add the gnocchi.) Sprinkle with 1/4 tsp. salt and cook, shaking the pan occasionally to turn the gnocchi, until they’re lightly browned, about 2 minutes..
6. Transfer to a large plate. Repeat with the remaining gnocchi..
Make the Sauce:
1. Wipe the skillet clean if necessary. Put it over medium-high heat and add the butter..
2. When the butter has almost completely melted, stir in the sage leaves. 3. Cook, stirring occasionally, until the butter turns a light brown color (be careful not to let it burn) and the sage leaves darken and crisp up slightly, 2 to 3 minutes..
4. Stir in pumpkin, pumpkin spice and brown sugar then remove from heat..
5. Add the reserved gnocchi and toss to coat well. Season to taste with salt and pepper. Serve immediately.
Garnish:
1. Toast pumpkin seeds in a skillet over medium heat for several minutes, toss with cinnamon sugar and allow to cool on a piece of parchment paper till ready to use. (May add a small amount of butter or oil with the seeds when toasting to allow the cinnamon sugar to stick more, but seeds will be tacky to the touch)

Notes: "For Gnocchi Recipe"
Ingredients:
3 large baking (Idaho) Potatoes (about 1 3/4 pounds), scrubbed
1 large Egg
1 teaspoon Sea Salt
1/4 teaspoon freshly ground White Pepper
Pinch of freshly grated Nutmeg
1/4 freshly grated Parmigiano-Reggiano cheese
2 cups unbleached all-purpose Flour, or as needed

Directions:
1. Place the potatoes in a large pot with enough cold water to cover. Bring the water to a boil and cook, partially covered, until the potatoes are easily pierced with a skewer but the skins are not split, about 35 minutes. (Alternatively, the potatoes can be baked in a preheated 400 degree oven until tender, about 40 minutes.)
2. Drain the potatoes and let them stand just until cool enough to handle. (The hotter the potatoes are when they are peeled and riced, the lighter the gnocchi will be.)
3. Working quickly and protecting the hand that holds the potatoes with a folded kitchen towel or oven mitt, scrape the skin from the potato with a paring knife..
4. Press the peeled potatoes through a potato ricer. Alternatively, the potatoes can be passed through a food mill fitted with the fine disc, but a ricer makes fluffier potatoes and therefore lighter gnocchi..
5. Spread the riced potatoes into a thin, even layer on the work surface, without pressing them or compacting them. Let them cool completely.
6. In a small bowl, beat the egg, salt, pepper, and nutmeg together. Gather the cold potatoes into a mound and form a well in the center. Pour the egg mixture into the well..
7. Knead the potato and egg mixtures together with both hands, gradually adding the grated cheese and enough of the flour, about 1 1/2 cups, to form a smooth but slightly sticky dough..
8. It should take no longer than 3 minutes to work the flour into the potato mixture; remember, the longer the dough is kneaded, the more flour it will require and the heavier it will become..
9. As you knead the dough, it will stick to your hands and to the work surface: Repeatedly rub this rough dough from your hands and scrape it with a knife or dough scraper from the work surface back into the dough as you knead..
10. Wash and dry your hands. Dust the dough, your hands, and the work surface lightly with some of the remaining flour. Cut the dough into six equal pieces and set off to one side of the work surface. Place one piece of dough in front of you and pat it into a rough oblong..
11. Using both hands, in a smooth back-and-forth motion and exerting light downward pressure, roll the dough into a rope 1/2 inch thick, flouring the dough if necessary as you roll to keep it from sticking. (When you first begin making gnocchi, until your hands get the feel of the dough, you may find it easier to cut each piece of dough in half to roll it.)
12. Slice the ropes into 1/2-inch-thick rounds. Sprinkle the rounds lightly with flour and roll each piece quickly between your palms into a rough ball, flouring the dough and your hands as needed to prevent sticking..
13. Hold the tines of a fork at a 45-degree angle to the table with the concave part facing up. Dip the tip of your thumb in flour. Take one ball of dough and with the tip of your thumb, press the dough lightly against the tines of the fork as you roll it downward toward the tips of the tines. As the dough wraps around the tip of your thumb, it will form into a dumpling with a deep indentation on one side and a ridged surface on the other..
14. Set on a baking sheet lined with a floured kitchen towel and continue forming gnocchi from the remaining dough balls. Repeat the whole process with the remaining pieces of dough. At this point the gnocchi must be cooked immediately or frozen..

"Fall Colors"

"Frosted Pumpkin Nutella Pop-Tarts"

It's fall, the leaves are finally changing colors and Halloween is almost upon us—and with that, also, there has been the kids return to school and everything that entails...

After school activities, sports, tournaments, projects, homework and a million other little things to keep the parents as busy as the kids—especially when you take into account work, family dinners and packed lunches...


With that in mind I wanted to make a recipe with a few easy over the counter items, that could be made ahead of time and saved for when you need it for the little crumbsnatchers gallivanting about your homes...

What better snack could fit this than a Fall take on a toaster classic—the "Pop-Tart"


Using pre-made store bought pie crusts, canned pumpkin, Nutella and some tubs of buttercream frosting—an what you end up with is an incredibly delicious treat that can be fridged or frozen for days or weeks in advance...

Heat it in a toaster oven, frost it and sprinkle a bit of cinnamon sugar on top for good measure and yum, just yum...


Truly can't beat it for a quick fix before your kids youth tournament or for that next play date...

Try it out for yourself one day; I truly think you'll find it, like me, oh so "Definitely Delish"


"Frosted Pumpkin Nutella Pop-Tarts" with "Cinnamon Sugar"

Ingredients:
Pies:
4 packages raw pie crust
1 cup pumpkin puree (not canned pumpkin pie mix)
1 egg
1/4 cup packed dark brown sugar (use 1/3 cup if you want it sweeter)
1/2 teaspoon ground cinnamon
1/8 teaspoon ground cloves
1/4 teaspoon ground nutmeg
1/4 teaspoon ground allspice
1/4 teaspoon salt
1 tablespoon light cream
1 cup Nutella, melted
2 tubs store-bought Buttercream Frosting

Glaze: (If using glaze, follow glaze directions)
1/4 cup butter  
2/3 cup + 2 tablespoons powdered sugar
2 tablespoon pure maple syrup
1 1/2 teaspoons vanilla extract
1 tablespoon light cream, if needed
1/2 cup cinnamon sugar, for sprinkling

Directions:
1. Preheat the oven to 350 degrees F...
2. In a bowl beat together the pumpkin, egg, brown sugar, cinnamon, ginger, nutmeg, salt and milk until smooth...
3. On a floured surface, roll the dough out into an 1/8-inch thickness. Cut the dough into rectangles, roughly about 4 x 3 inches. Place a heaping tablespoon of the pumpkin filling on one of the rectangles, smoothing the pumpkin out to just before the edge of the dough...
4. Drizzle the melted Nutella over the pumpkin and use a toothpick or knife to lightly swirl the Nutella into the pumpkin...
5. Lay the another rectangle of dough over the filling and seal the edges by crimping with the back of a fork. Repeat until all the dough has been used, saving the scraps and re-rolling to make more rectangles...
6. Bake the pop tarts for 20 to 25 minutes, then let cool completely on the counter...

Glaze: (If freezing leave un-glazed and use frosting instead after reheating-see Notes)
1. While the pop-tarts cool make the frosting. Melt the butter on medium heat until frothy and then whisk in the powdered sugar, maple syrup and vanilla...
2. If needed, whisk in the milk to thin. If the frosting seems too thin, add 1 tablespoon powdered sugar at a time until the frosting is thick, but pour-able...
3. Drizzle the glaze over the cooled pop-tarts and sprinkle generously with cinnamon sugar. The glaze will harden after 5-10 minutes...

Note:
1. Store in an airtight container for up to 4-6 days in the fridge. If desired these can be heated in a 350 degree oven for 3-5 minutes to warm them before eating, BUT the glaze will melt slightly on the pop-tart.
2. Un-glazed pop-tarts can be frozen for up to 3 months. Thaw and then heat in the oven at 350 for 5-10 minutes..
3. If saving Pop-Tarts for later, after reheating, frost with pre-made store bought buttercream frosting and sprinkle with cinnamon sugar. (I used Pillsbury but any brand is as good)